Key Features
- Swift Example App accessing a LoopBack Backend providing basic Create, Read, Update and Delete operations
- Supports iOS 9, written in Swift 2
- Uses the official Loopback iOS SDK
- Source code includes LoopBack Server Test App
Source Code
Available on GitHub: https://github.com/kgoedecke/loopback-swift-crud-example
Screenshots
Prerequisites
- Deployed LoopBack Test App available here:
GitHub: kgoedecke/loopback-swift-crud-example – LoopBack Server App - Make the LoopBack iOS SDK available through Cocoapods as introduced here:
Using LoopBack iOS SDK with Cocoapods in Swift - An app including a Table View Controller and a View Controller providing a Text Field and a Slider (See screenshots above)
This article focuses on using the LoopBack iOS SDK in Swift and thus we won’t cover creating View Controllers and its Actions. You might want to check out this tutorial provided by Apple to get a started:
Start Developing iOS Apps (Swift): Implement Edit and Delete Behavior
Getting Started
Start the LoopBack Test App by running node . in the main folder. The Test App will by default listen on http://localhost:3000 .
In order to access the LoopBack Backend from your Swift App we will add an instance of LBRESTAdapter to the applications AppDelegate.
Open AppDelegate.swift and insert the following right after var window: UIWindow?
static let adapter = LBRESTAdapter(URL: NSURL(string: "http://localhost:3000"))
This way we can access the adapter from everywhere in the project.
Subclassing LBPersistedModelRepository & LBPersistedModel
The LoopBack Test App provides a Model named “Widgets“, which has multiple attributes, as you can see in this JavaScript snippet from the source code of the LoopBack Test app.
var Widget = app.model('widget', {
  properties: {
    name: {
      type: String,
      required: true
    },
    bars: {
      type: Number,
      required: false
    }, ...
We are only going to use the name (type: String) and the bars (type: Number) attribute.
All data corresponding to a Model is handled by a Repository in the LoopBack iOS SDK. The Repository can then be used to create new models, update existing ones or simply retrieve all currently stored ones. As every model has individual attributes we need to create a Subclass of LBPersistedModelRepository and LBPersistedModel and declare those attributes as well as the custom model name.
Create a new Swift file, name it “WidgetRepository.swift” and insert the following code:
import Foundation

class WidgetRepository : LBPersistedModelRepository     {
    override init() {
        super.init(className: "widgets")
    }
    class func repository() -> WidgetRepository {
        return WidgetRepository()
    }
}
Line 3: Creates a subclass of LBPersistedModelRepository named WidgetRepository, which will later be used to perform the CRUD operations.
Line 4: Specify the initializer methods and simply call initWithClassName from the LBPersistedModelRepository class
Line 7: Provides a class function that returns an object of the WidgetRepository class
Afterwards create an other Swift file named “Widget.swift” with the following code:
class Widget : LBPersistedModel {
    var name: String!
    var bars: NSNumber!
    var date: NSDate!
    var data: NSObject!
}
This creates a Subclass of the LBPersistedModel and introduces the attributes that each Widget object contains.
WidgetRepository
To perform basic CRUD operations as simple as possible from everywhere in your app add an other static var of type WidgetRepository to your AppDelegate. The WidgetRepository object will provide functionality to create new models, updates existing models or simply retrieve data.
Right after your LBRESTAdapter in AppDelegate.swift create the instance of WidgetRepository:
Insert the following code:
static let widgetRepository = adapter.repositoryWithClass(WidgetRepository) as! WidgetRepository
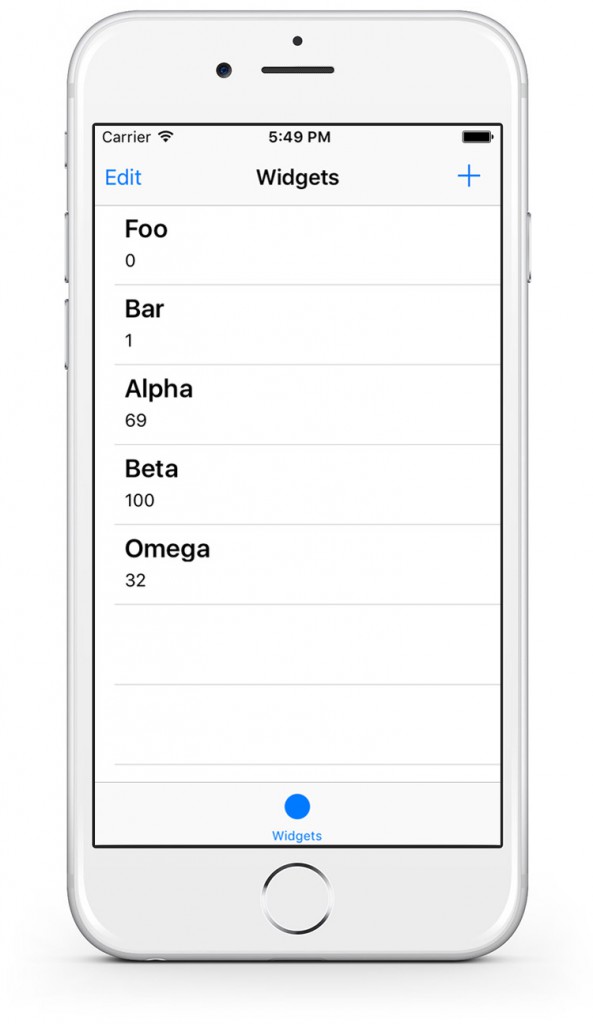
Displaying all Widgets
By now you should already have a TableViewController in your project that will display all Widget Models in a TableView. Open this Table View Controller now.
Insert the following in your Class:
var widgets = [Widget]()
This Array of Widgets will hold the elements that will be displayed in the Table View.
In viewDidLoad() we are going to call allWithSuccess() on our widgetRepository to retrieve all Models and in the Callback assign the local widgets Array (self.widgets ) to the fetched Widgets from the remote Backend:
AppDelegate.widgetRepository.allWithSuccess({ (fetchedWidgets: [AnyObject]!) -> Void in
		self.widgets = fetchedWidgets as! [Widget]
		self.tableView.reloadData()
	}, failure: { (error: NSError!) -> Void in
	    NSLog(error.description)
})
Next in tableView(tableView: UITableView, cellForRowAtIndexPath indexPath: NSIndexPath) dequeue a Reusable Cell and set its values to the ones of the appropriate Widget element (we assume that you created a custom UITableViewCell with two Outlets for the “name” and the “bars” numerical value):
let cell = tableView.dequeueReusableCellWithIdentifier("tableCell", forIndexPath: indexPath) as! WidgetTableViewCell
cell.nameLabel.text = widgets[indexPath.row].name
cell.valueLabel.text = String(widgets[indexPath.row].bars)
return cell
Checkpoint: If you run your app now, then you should be able to see all the Widgets in your TableViewController.
Deleting a Widget
Your Table View Controller should also contain the tableView(_:commitEditingStyle:forRowAtIndexPath:) delegate function if you enabled the editing mode. Add the following snippet:
override func tableView(tableView: UITableView, commitEditingStyle editingStyle: UITableViewCellEditingStyle, forRowAtIndexPath indexPath: NSIndexPath) {
    if editingStyle == .Delete {
        // Delete the row from the data source
        widgets[indexPath.row].destroyWithSuccess({ () -> Void in
            self.widgets.removeAtIndex(indexPath.row)
            self.tableView.deleteRowsAtIndexPaths([indexPath], withRowAnimation: .Fade)
            }, failure: { (error: NSError!) -> Void in
                NSLog(error.description)
        })
    }
}
Here we trigger the deletion of a Widget. If the user deletes a Widget, we first remove it from the Backend by calling destroyWithSuccess on the repository and then from the local Array as well as from the Table View.
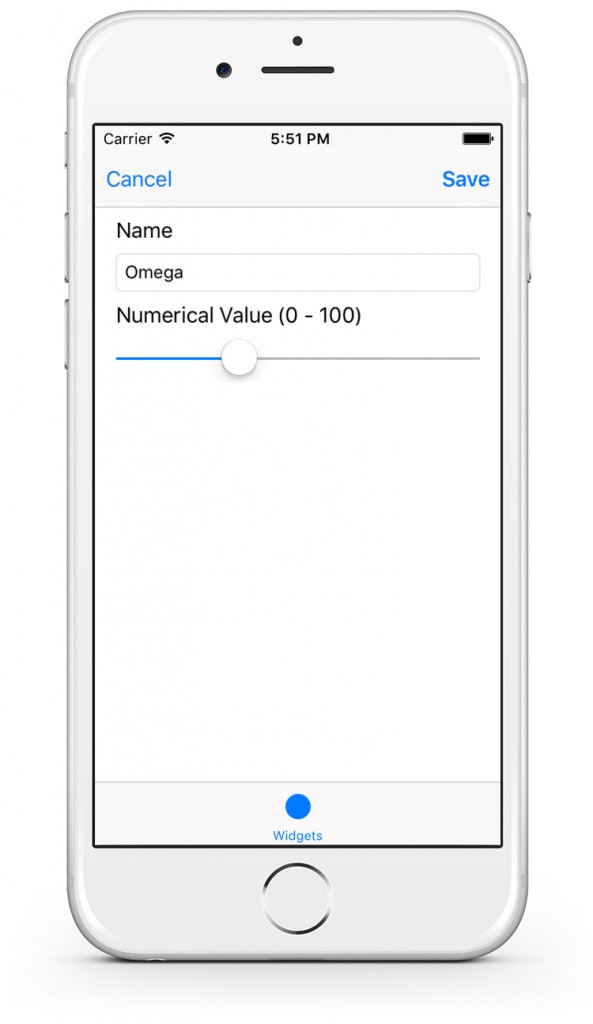
Creating and Updating Widgets
Open the View Controller for the detail view of the Widget.
In the Class declare a widget variable holding the current Widget object:
var widget: Widget?
In case the View Controller is loaded to update an existing widget we need to fill the textfields with the appropriate data.
In viewDidLoad() we first check if the local widget object is set and if it is we load the data into the textfield and the slider.
Your viewDidLoad() should contain the following now:
super.viewDidLoad()
if let widget = widget  {
	nameTextField.text = widget.name
	numberValueSlider.value = widget.bars as Float
}
At this point we assume that you already created two Segues from the TableViewController in your Storyboard – One for creating a new Widget and one for updating an existing one.
So your Storyboard should look at this point similar to this:
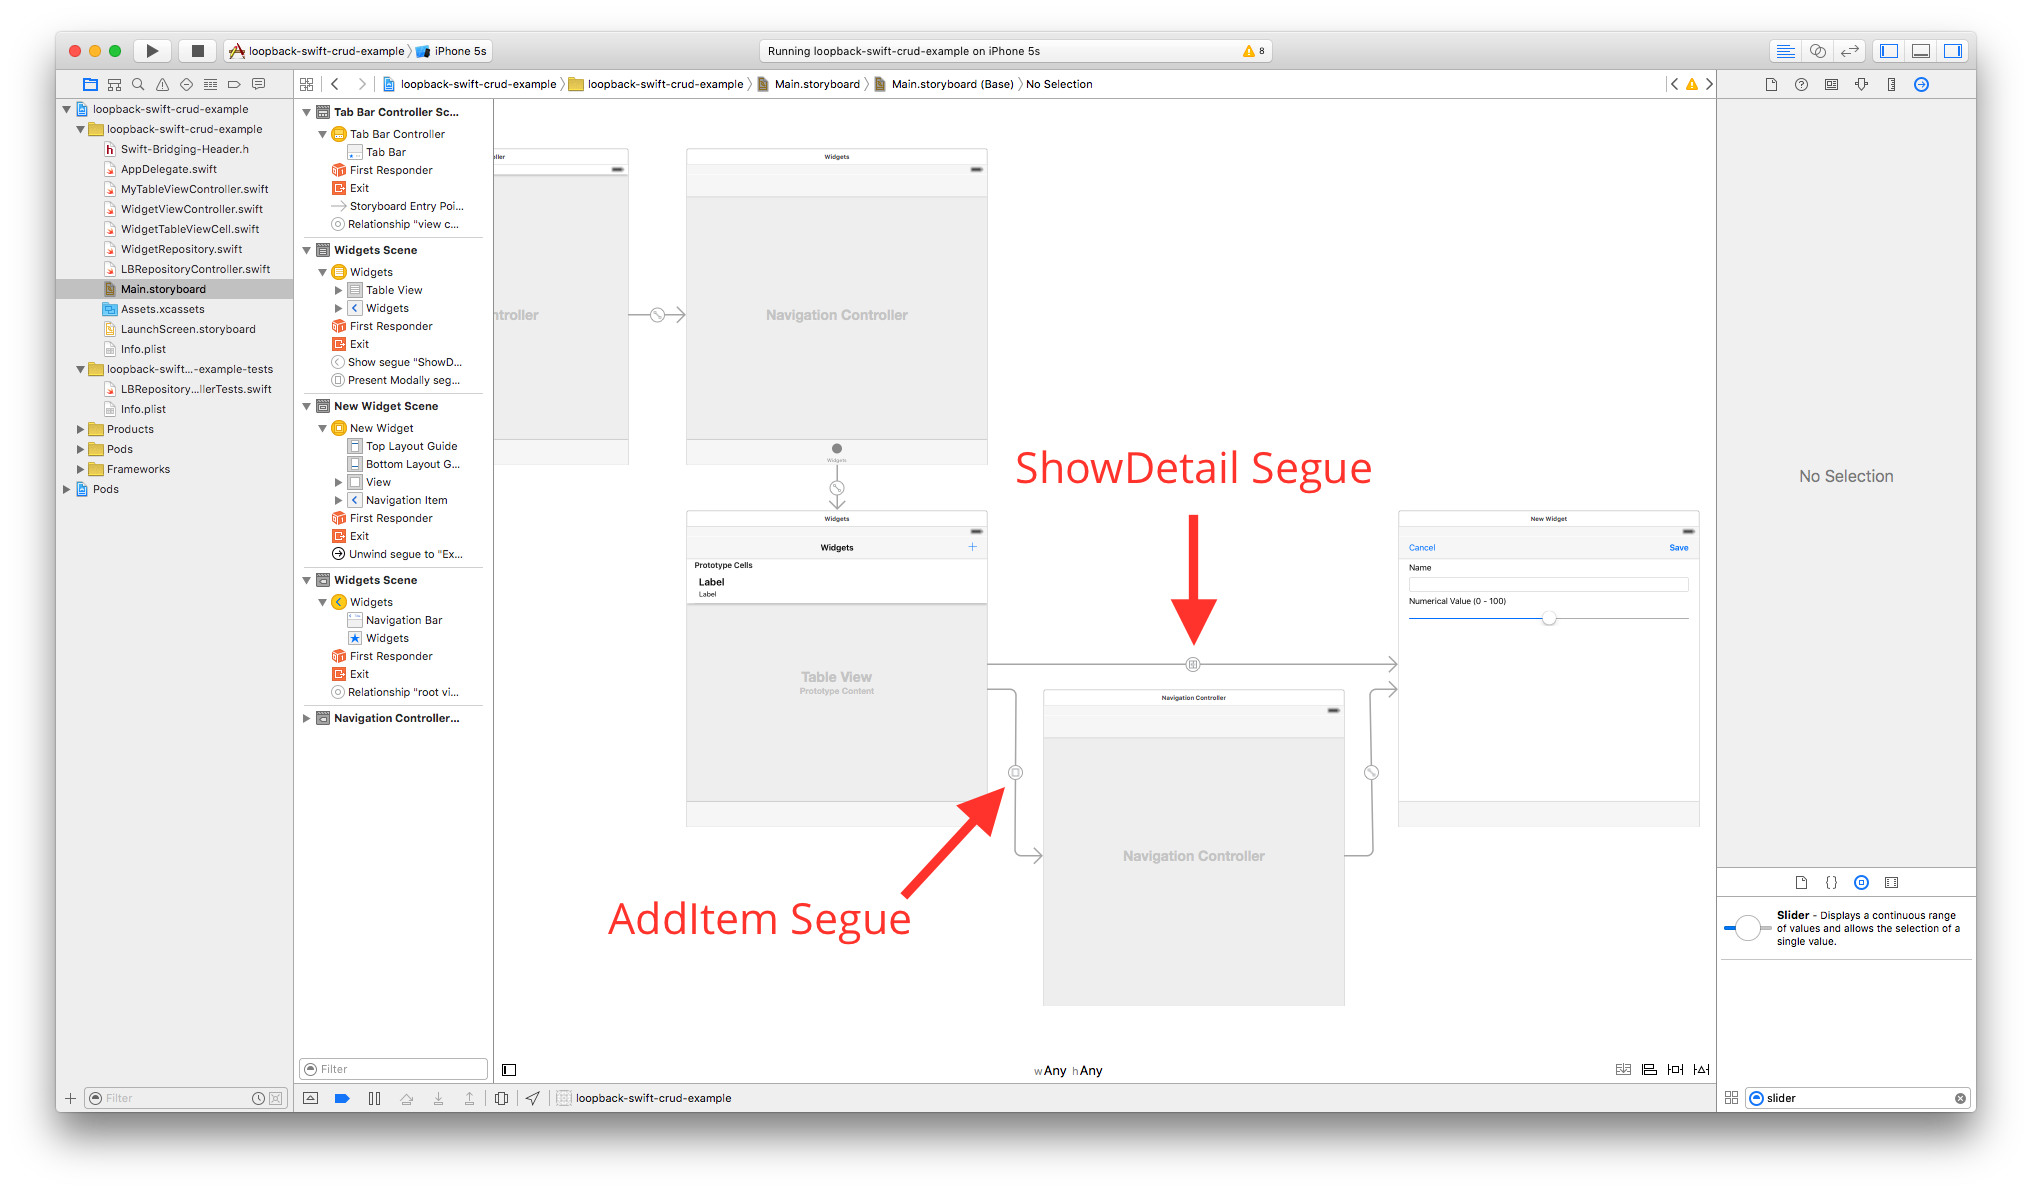
Switch back to your Table View Controller and insert the prepareForSegue function. Add the following code:
override func prepareForSegue(segue: UIStoryboardSegue, sender: AnyObject?) {
    if segue.identifier == "ShowDetail" {
        let widgetDetailViewController = segue.destinationViewController as! WidgetViewController
        if let selectedWidgetCell = sender as? WidgetTableViewCell {
            let indexPath = tableView.indexPathForCell(selectedWidgetCell)!
            let selectedWidget = widgets[indexPath.row]
            widgetDetailViewController.widget = selectedWidget
        }
    }
    else if segue.identifier == "AddItem" {
        NSLog("Adding new widget")
    }

}
All that’s pretty much happening here is that if the segue.identifier is equal to “ShowDetail” we set the destinationViewControllers widget object to the currently selected Widget of the Table View Controller.
Next we will add an IBAction to the Table View Controller, which will be triggered when the user hits the Save button in the detail view.
@IBAction func unwindToWidgetList(sender: UIStoryboardSegue) {
    if let sourceViewController = sender.sourceViewController as? WidgetViewController, widget = sourceViewController.widget {
        if let selectedIndexPath = tableView.indexPathForSelectedRow {
            widgets[selectedIndexPath.row] = widget
            tableView.reloadRowsAtIndexPaths([selectedIndexPath], withRowAnimation: .None)
        }
        else    {
            let newIndexPath = NSIndexPath(forRow: widgets.count, inSection: 0)
            self.widgets.append(widget)
            self.tableView.insertRowsAtIndexPaths([newIndexPath], withRowAnimation: .Bottom)
        }
    }
}
Line 3: By checking if a row in the table view was selected we determine if the user updated an existing Widget or if he created a new one.
Line 4-5: In case the user updated an existing Widget we simply reload the row, as the update is being handled in the detail view controller.
Line 8-10: In case the user added a new Widget, we take the sourceViewControllers widget object and append it to the local array of Widgets. Afterwards we insert a new row into the TableView. The actual creation of the widget is being handled within the Detail View Controller.
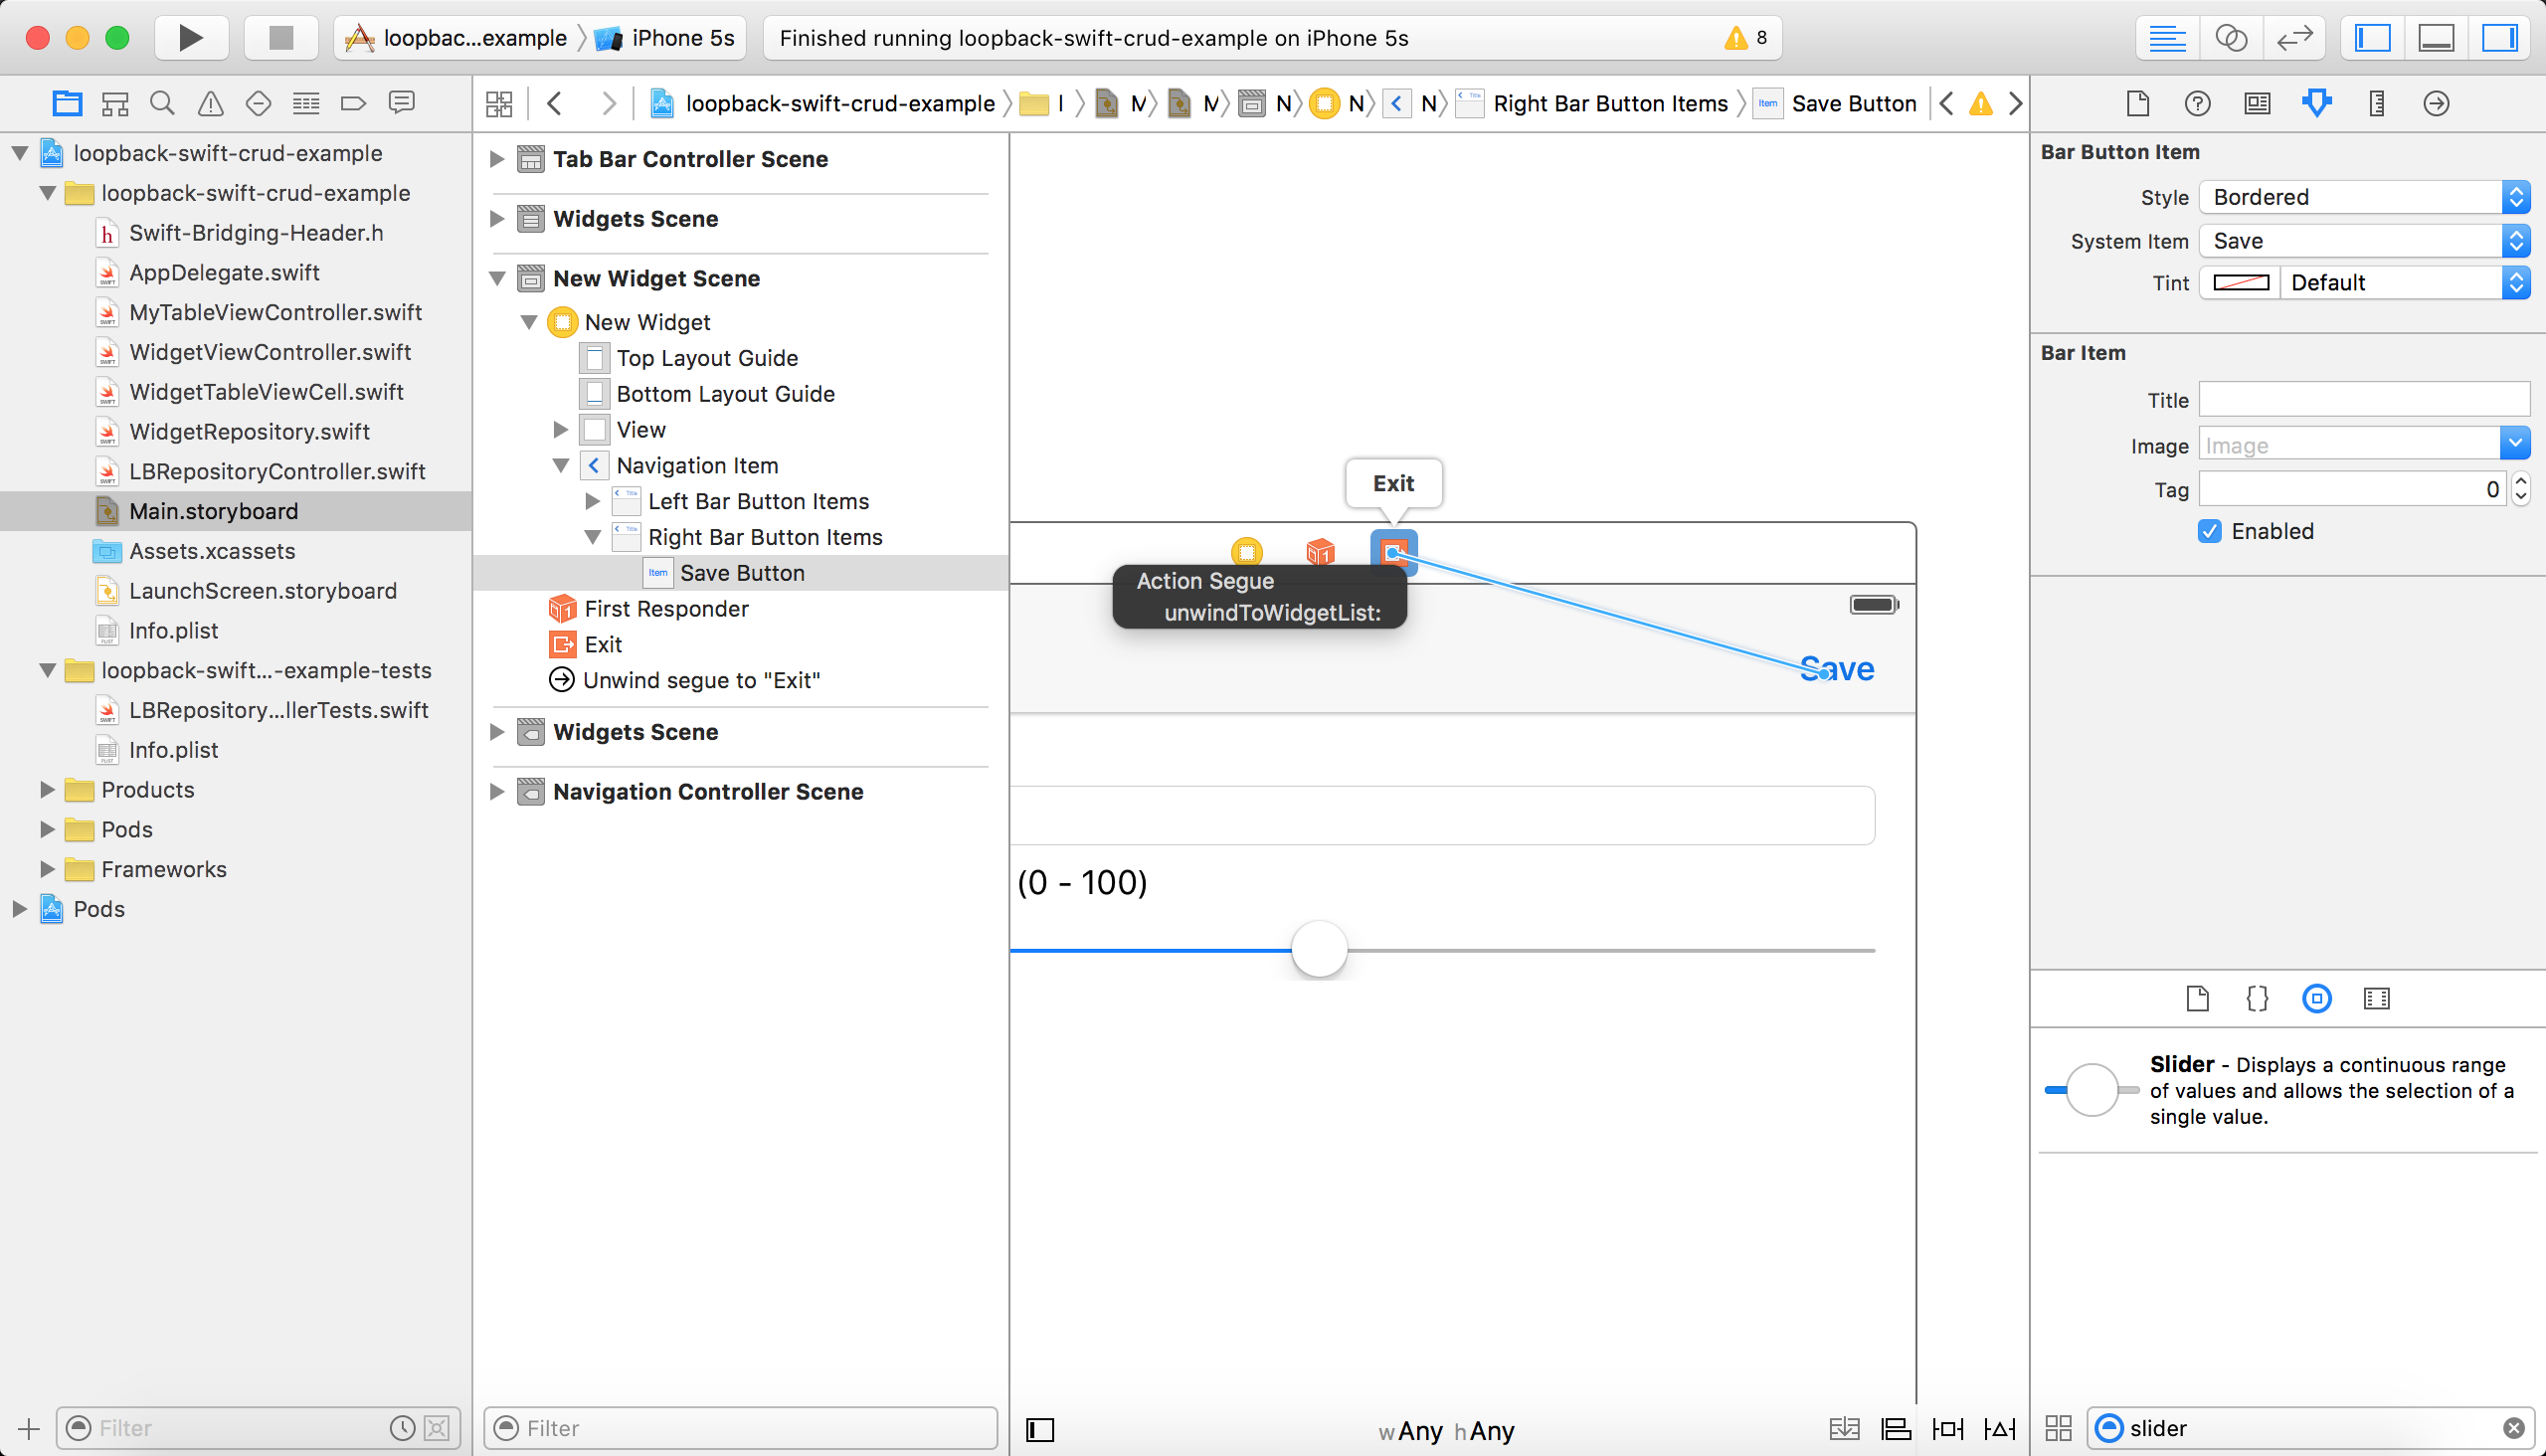
Next open the Storyboard and add an Action Segue from the Save button to trigger the unwindToWidgetList as shown in the screenshot below:
Now open your Detail View Controller and override the prepareForSegue function:
override func prepareForSegue(segue: UIStoryboardSegue, sender: AnyObject?) {
    if saveButton === sender {
        if let _ = widget {
            widget!.name = nameTextField.text ?? ""
            widget!.bars = Int(numberValueSlider.value)
            widget?.saveWithSuccess({ () -> Void in
                NSLog("Successfully updated Widget")
                }, failure: { (error: NSError!) -> Void in
                    NSLog(error.description)
            })
        }
        else    {
            if let name = nameTextField.text where name != "" {
                widget = AppDelegate.widgetRepository.modelWithDictionary(nil) as? Widget
                widget!.name = name
                widget!.bars = Int(self.numberValueSlider.value)
                widget?.saveWithSuccess({ () -> Void in
                    NSLog("Successfully created new Widget")
                    }, failure: { (error: NSError!) -> Void in
                        NSLog(error.description)
                })
            }
        }
    }
}
If the SaveButton was clicked we determine if the user is creating a new Widget or updating an exiting one.
Line 4-5: Sets the attributes of the local widget object to the updated values
Line 6-10: Then we call saveWithSuccess to save the changes to the LoopBack backend
Line 14-16: If the user is creating a new Widget then we instantiate a new Widget with modelWithDictionary(nil) and set its values accordingly
Line 17: Save the newly created Widget. By finally executing saveWithSuccess the object gets assigned its internal id value and gets created on the LoopBack Backend.
Done
That’s it now! By now you should have a Swift app using the LoopBack iOS SDK that provides CRUD functionality for the Widget model.
If you have any questions or feedback, just post a comment 😉
This is also a cool doc! Thank you, Kevin for the work!
Could I ask you a question? You override init!(className name: String!) in WidgetRepository, but I’m wondering if it is really a necessary… Would you please tell me in which case it is required?
It’s probably not necessary and I’ll remove it in a fix! Thanks for pointing that out hideya.
I like your approach with this code but it doesn’t work in my case. For some reason it refuses to type cast the return models to [LBPersistedModel]
I get the “Successfully received all Models for Repository Type” log message but I get this error right after:
NSArray element failed to match the Swift Array Element type
it fails here: succeed(models as! [LBPersistedModel])
does your example only work with properties that are strings and Int? some of my properties are [String] and Distionaries of other models
How did you declare your Array in your custom class that inherits from LBPersistedModel? It might help to use NSArray instead of Swift Arrays.
All I get is this:
Could not cast value of type LBModel to LBPersistedModel
at this line: —> print(“models: \(models[0] as! LBPersistedModel)”) that i placed right after your code: NSLog(“Successfully received all Models for Repository Type”)
Does your custom class inherit from LBPersistedModel or from LBModel (in my case Widget introduced in WidgetRepository.swift)? It needs to be LBPersistedModel!
Ok…here is why i’m confused. In my loopback backend, my model extend the PerssitedModel class but when I get the models back from this function: self.repository.allWithSuccess –> I get an array of LBModel. Shouldn’t I get a array of LBPersistedModel?
I’m thinking that it’s because I have a custom name for my ID field. I use orientDb as my dataSource so the ID generated are called “@rid” which is what I use.
Could that be the problem? do I have to have an id field named “id” or “_id” for it to be recognized as LBPersistedModel? Currently my id field is name “@rid”. Let me know what you think.
In your Swift file have you specifically declared to inherit from LBPersistedModel (Note: I’m talking about the swift code not the LoopBack Backend app)
class Widget : LBPersistedModel {
…
}
If you made sure thats correctly implemented, let me know and I’ll look in the ID thing.
Cheers
Yes…it is correctly implemented. I have it class MyCustomClass : LBPersistedModel {} inside the swift code.
I’m pretty sure that when the data comes back from the server, it doesn’t recognize the model and LBPersisted because it can’t match and proper ID field. Isn’t the ID the main difference between a LBModel and LBPersistedModel?
I believe I correctly implemented the swift side of things and my code matches yours. The only problem I have is that when I check the type of what is returned, I see LBModel as was should expect to see LBPersistedModel since my class custom class extends it in the swift code.
I’m curious to see if you get the same problem by changing the name of your ID field on your backend.
I can’t reproduce this issue. I changed my Widget Model to have a custom id field:
var Widget = app.model(‘widget’, {
properties: {
myId: {
type: String,
id: true
}, …
And it still returns a LBPersistedModel, could you maybe open an issue on GitHub and post some of your code, here’s the repo for the project: https://github.com/kgoedecke/loopback-swift-crud-example
OK i finally found the problem and was able to reproduce it. It was a naming issue problem but it had nothing to do with the ID field.
The problem is produced when you name your repository with underscore “_”
I was able to reproduce the problem using the github link that you sent simply by changing the name of WidgetRepository to Widget_Repository and it crashes just like in my project.
I confirm that was my issue by removing the underscore from my model repository name and it worked!!! Now the models come back as expexted!
This is a weird issue and i’m sure i’m not the only one who names things with underscore so I hope this reply thread can help the next person with this issue!
PS. here are the changes i’ve made to your code to reproduce the error:
in AppDelegate.swift:
static let widgetRepository = adapter.repositoryWithClass(Widget_Repository) as! Widget_Repository
in WidgetRepository.swift:
class Widget_Repository : LBPersistedModelRepository {
override init() {
super.init(className: “widgets”)
}
class func repository() -> Widget_Repository {
return Widget_Repository()
}
}
When you make those changes you will see that AllWithSuccess returns LBModel instead of LBPersistedModel and the app crashes!
As you can see here the naming convention for Swift class names shouldn’t include underscores “_”: https://github.com/raywenderlich/swift-style-guide#naming
thanks for the link…it’s good to have.
Coming from a language like javascript where underscore is widely used i’m glad to know it’s not the case with swift. I wish XCode should have highlighted it as an error or at least a warning…would have made finding the issue quicker
Hey Logiq, I just updated the tutorial and the source code on GitHub. Thanks to Hideya this seems to be an easier implementation and is more straight forward. I hope it helps you too!
Cheers
Logiq, I’m trying to setup Loopback with orientdb using the mattaylor/loopback-connector-orientdb connector . Do you have any working sample to share?
Thank you!!
Thanks for this crystal clear tutorial Kevin ! Resources around Loopback IOS SDK are surprisingly limited on the Internet and reading your blog posts was a relief. I kindly +1 Logiq request, it would be really great to have a tutorial for querying relations.
Right now I intend to build upon Ritchie Martori’s recommendation (https://github.com/strongloop/loopback-sdk-ios/issues/2) but I must admit it is not straightforward to me
I’m pretty busy these days, but I’m positive I will find some time to write such a tutorial soon, stay tuned! Maybe follow me on twitter @kgoedecke.
Cheers
I do not even know how I ended up here, however I assumed this post used to be great. I don’t realize who you might be however certainly you’re going to a famous blogger for those who aren’t already Cheers!
Could you maybe describe a example use case for the relations code you’d like to see?
Hey Laurent,
So I took a few minutes to look into this. From what I see it should be really straight forward by using findWithFilter, have you looked into this? See https://github.com/strongloop/loopback-sdk-ios/blob/master/LoopBackTests/LBPersistedModelTests.m#L103
Let me know if that resolves the issue?
Sure ! If we want to build on top of this tutorial would that make sense to create tags categorizing the widgets ? Widgets can be assigned many tags and the other way round. Then the user can drill down to narrow down the widget list through tables and stop anytime to see the list of widgets corresponding to the tag selection.
I am digging around in the meantime. Would you rely on RestKit framework ? https://github.com/RestKit/RestKit
Cheers
If you want to access the REST interface directly from Swift I’d recommend (Alamofire https://github.com/Alamofire/Alamofire), I thought about avoiding the SDK too, but so far the SDK worked fine for me. I’m on the new tutorial, you can expect something within the next week.
Cheers
Kevin
If there is a way to avoid third parties thats even better. I am looking forward to seing how you managed that
Cheers