In this tutorial we will create an iOS Swift app that uses the LoopBack iOS SDK to authenticate and manage a user against the LoopBack API. You’ll be able to register/login/logout and change your email address. This will give you a good starting point and an understanding on how to authenticate users in Swift with a LoopBack backend.
Key Features
- User Registration
- User Authentication (Login/Logout)
- Display User Details
- Edit User Details
- Supports iOS9 and Swift
Source Code
Available on GitHub: https://github.com/kgoedecke/loopback-swift-user-example
Screenshots
Prerequisites
- Deployed LoopBack Backend
- Model named “Client” that is a subclass of User (separate project will follow)
- Make LoopBack SDK available in Swift (See: Using LoopBack iOS SDK with Cocoapods in Swift)
Getting Started
So you’ve got your Loopback Backend up and running and it is accessible through a public URL. In this tutorial we will use http://api.backend.com:3000/api as a dummy URL for our Backend. You need to replace this with your actual Backend URL.
Create a new XCode Project (Tabbed Application) and make the LoopBack iOS SDK available in Swift (See: Using LoopBack iOS SDK with Cocoapods in Swift).
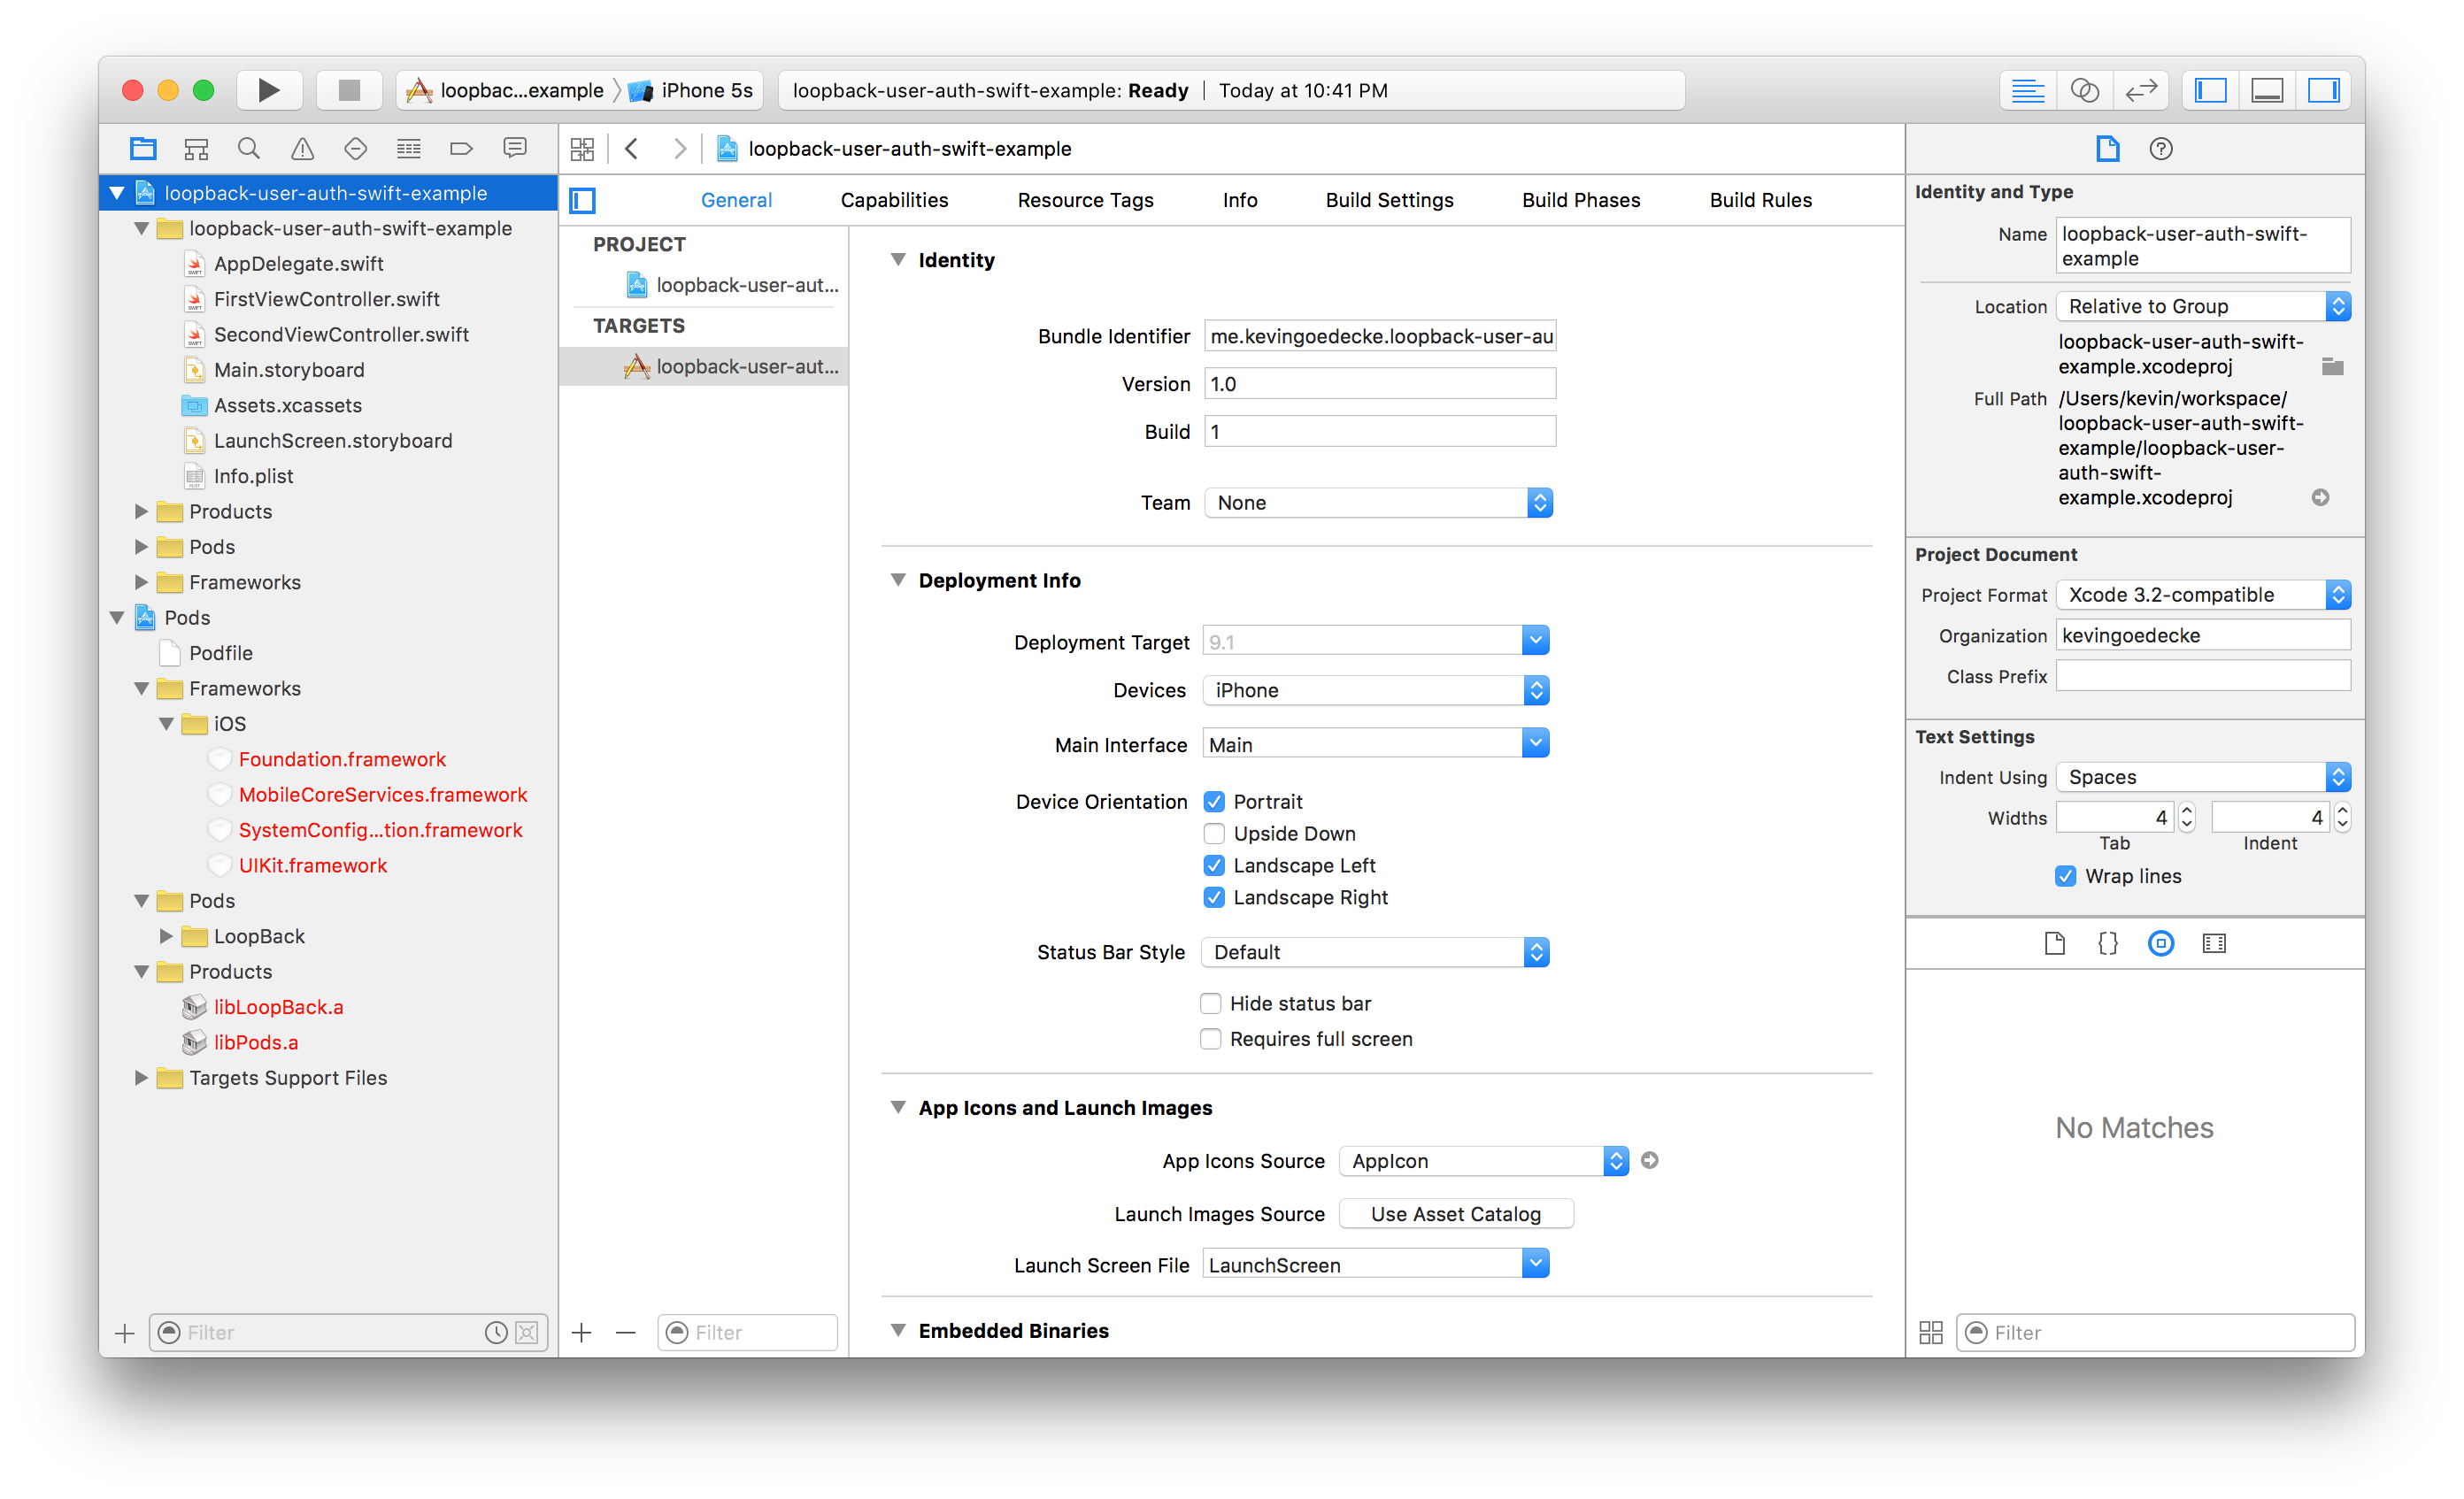
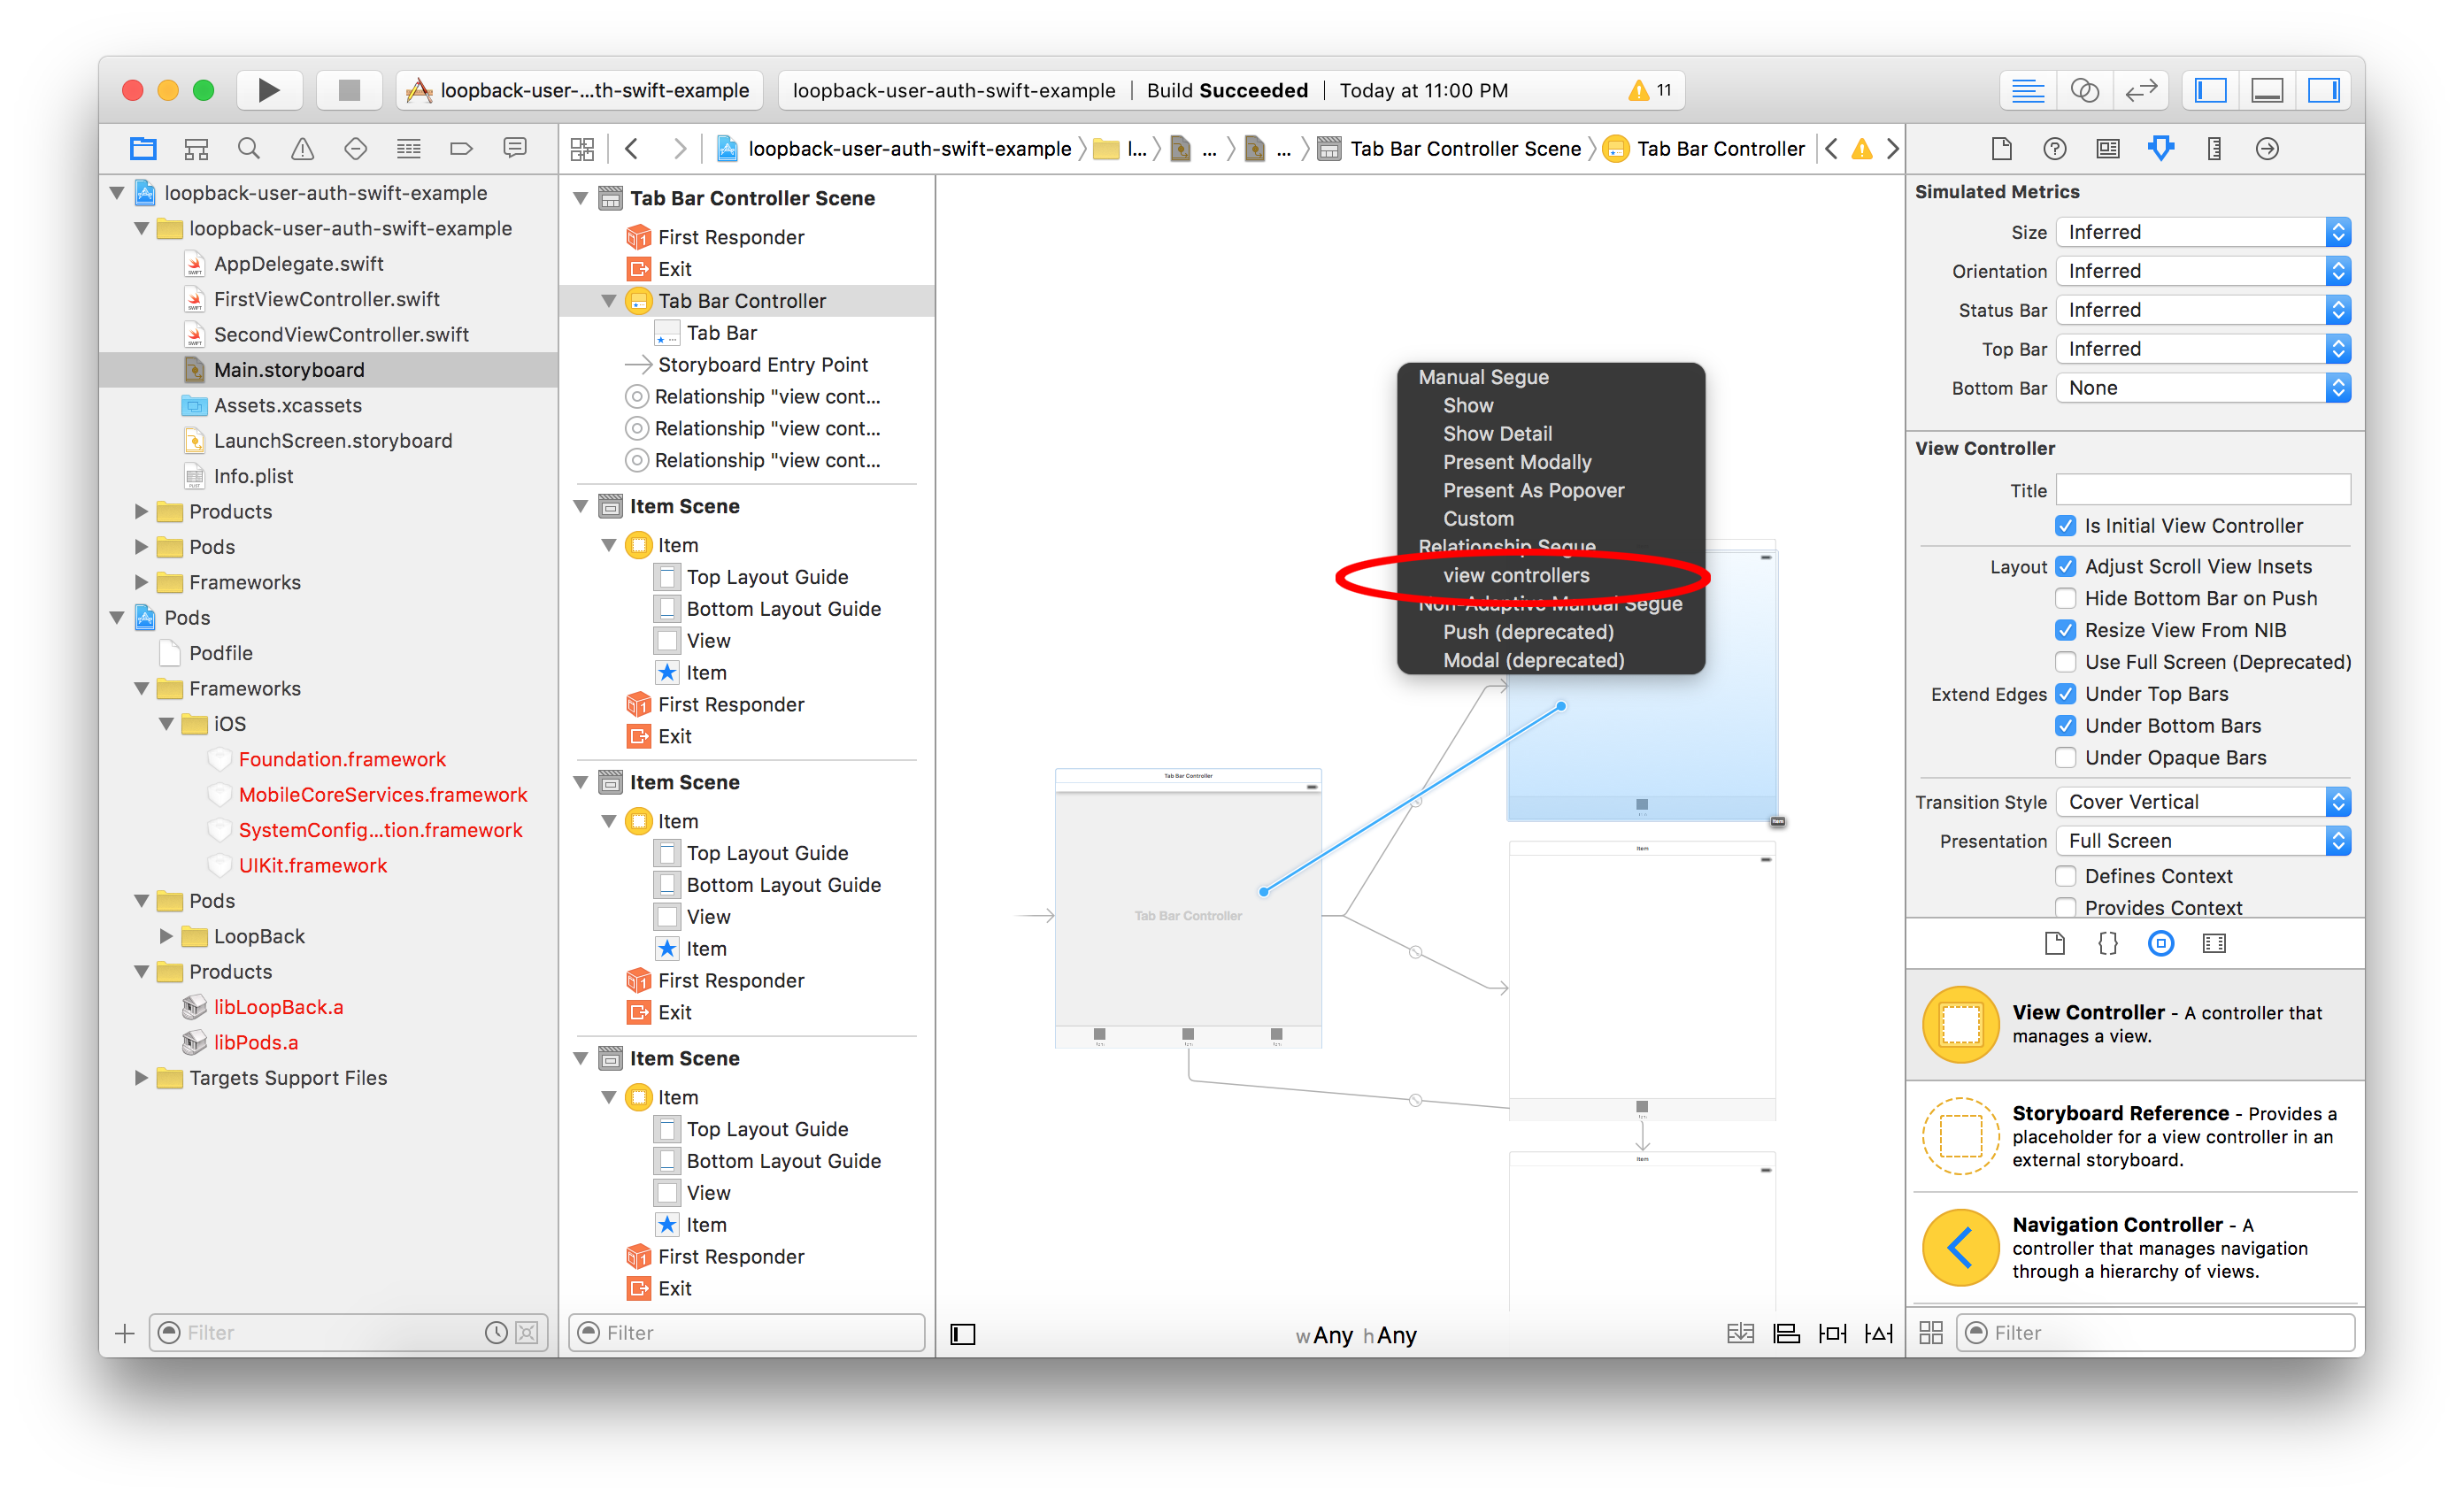
Delete the files FirstViewController.swift and SecondViewController.swift and also both View Controllers from the Storyboard. Your Storyboard should only contain one Controller now and that’s the Tab Bar Controller.
Afterwards drag three new View Controllers onto the Storyboard and connect them to the Tab Bar Controller by holding CTRL + Clicking and dragging from the Tab Bar Controller to each of the three View Controllers. Select “view controllers” as Relationship Segue.
UI Elements
Now that we have all our View Controllers, we are going to add the UI elements like buttons and text input fields.
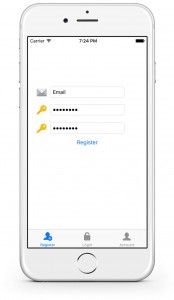
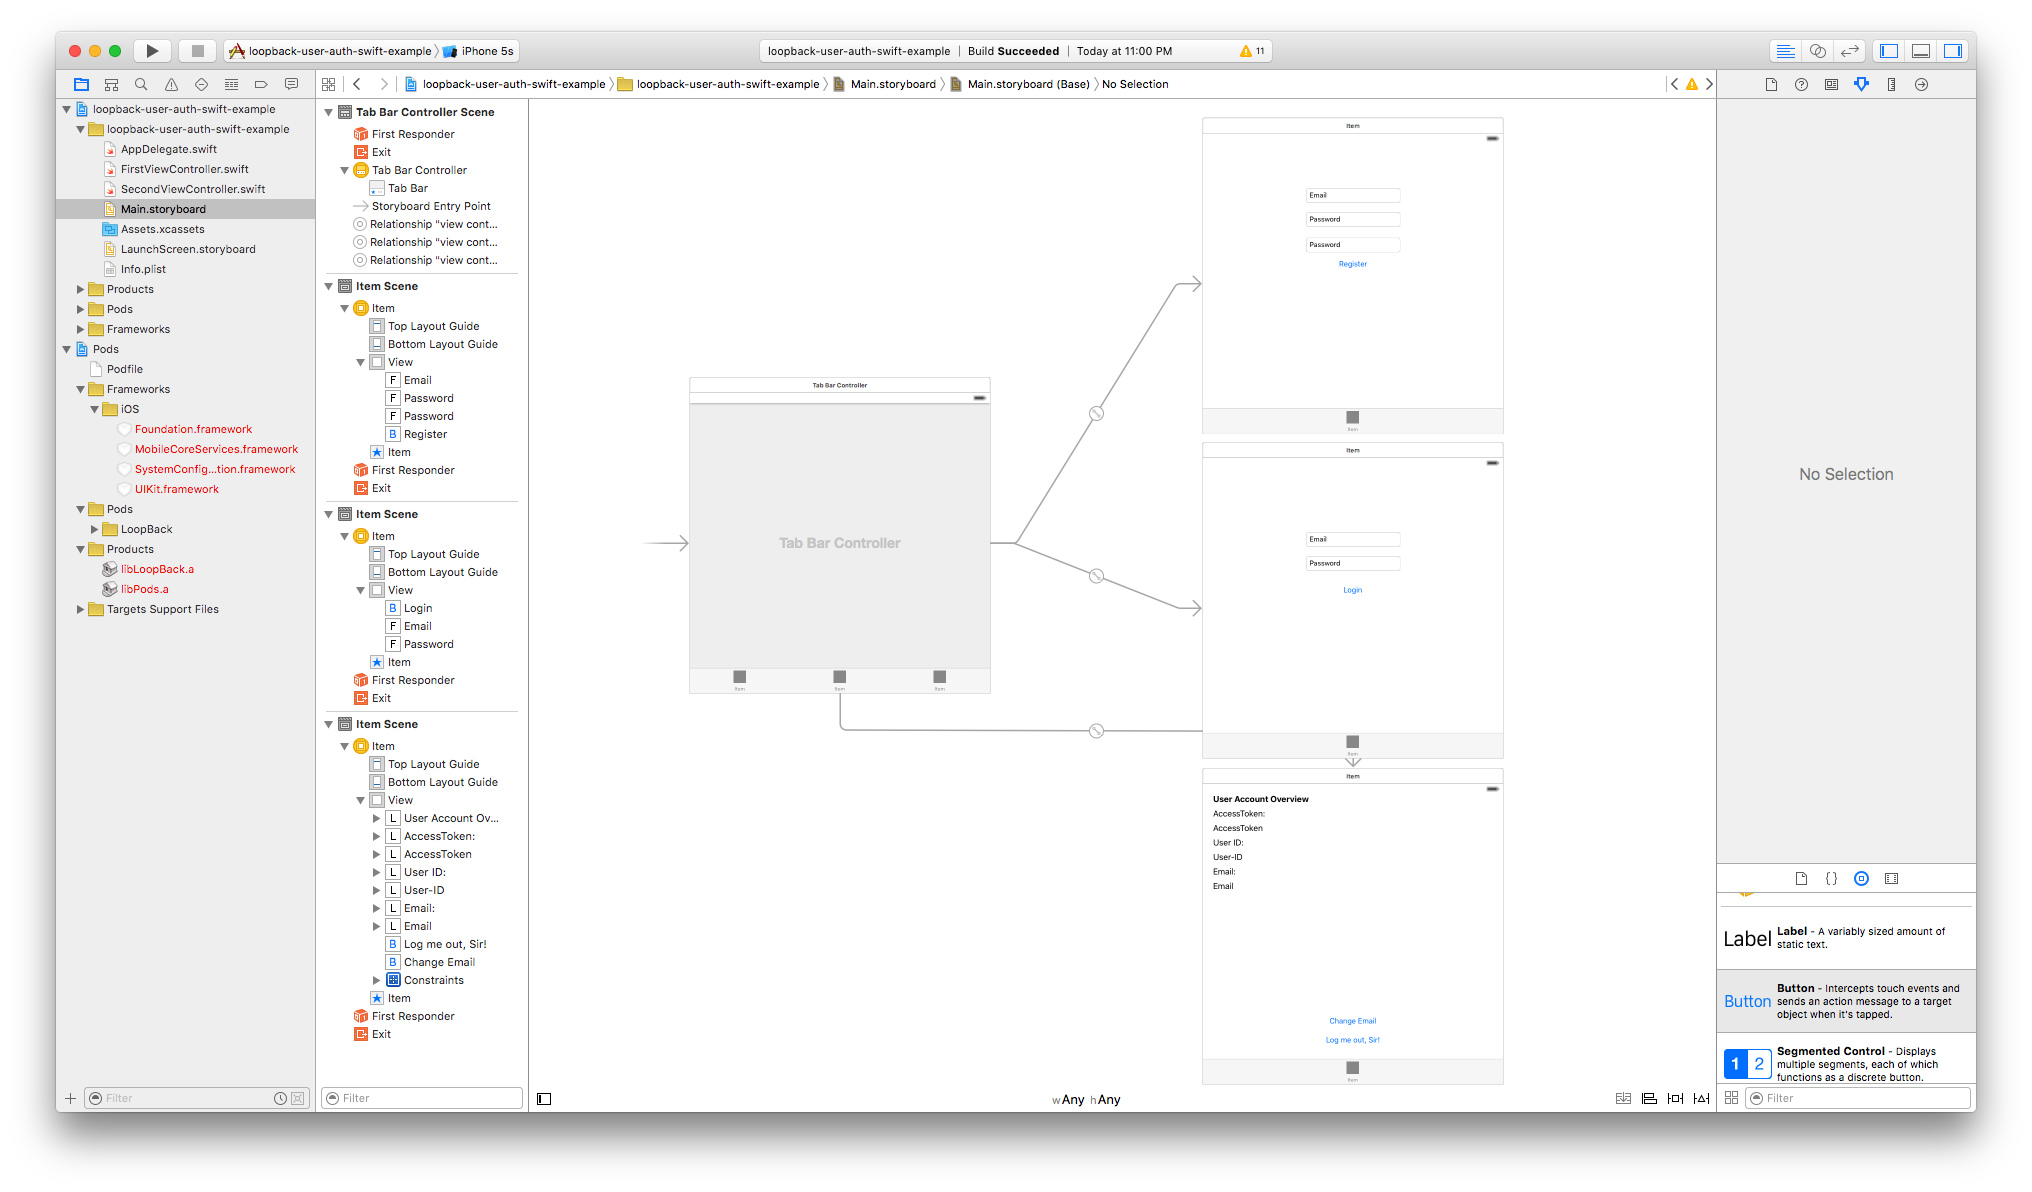
Drag the following elements on the top View Controller:
- 3x Text Fields (Email, Password, Repeat Password for the Registration)
- 1x Button (Register Button)
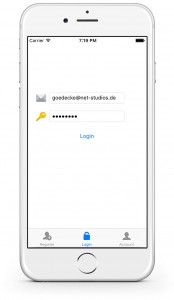
On the middle View Controller:
- 2x Text Fields (Email, Password for the Login)
- 1x Button (Login Button)
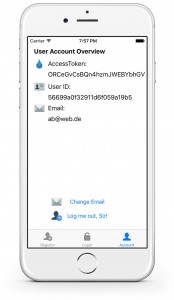
On the bottom View Controller:
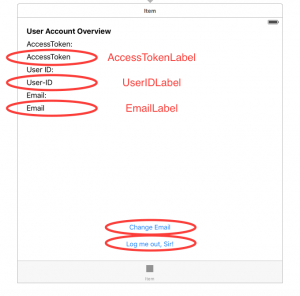
- 7x Labels (User Account Overview, AccessToken Headline, AccessToken, User ID Headline, User ID, Email Headline, Email
- 2x Buttons (Change Email Button, Logout Button)
View Controllers
Now that we have all our UI Elements in place, we going to create the View Controllers that are going to control them.
Open “File” -> “New” -> “File…” and select “Cocoa Touch Class” from “iOS” -> “Source”. When you press “Next” enter “RegisterViewController” as the Class name and as “Subclass of” select “UIViewController”.

Create two more View Controllers by repeating those steps and name them “LoginViewController” and “AccountViewController”.
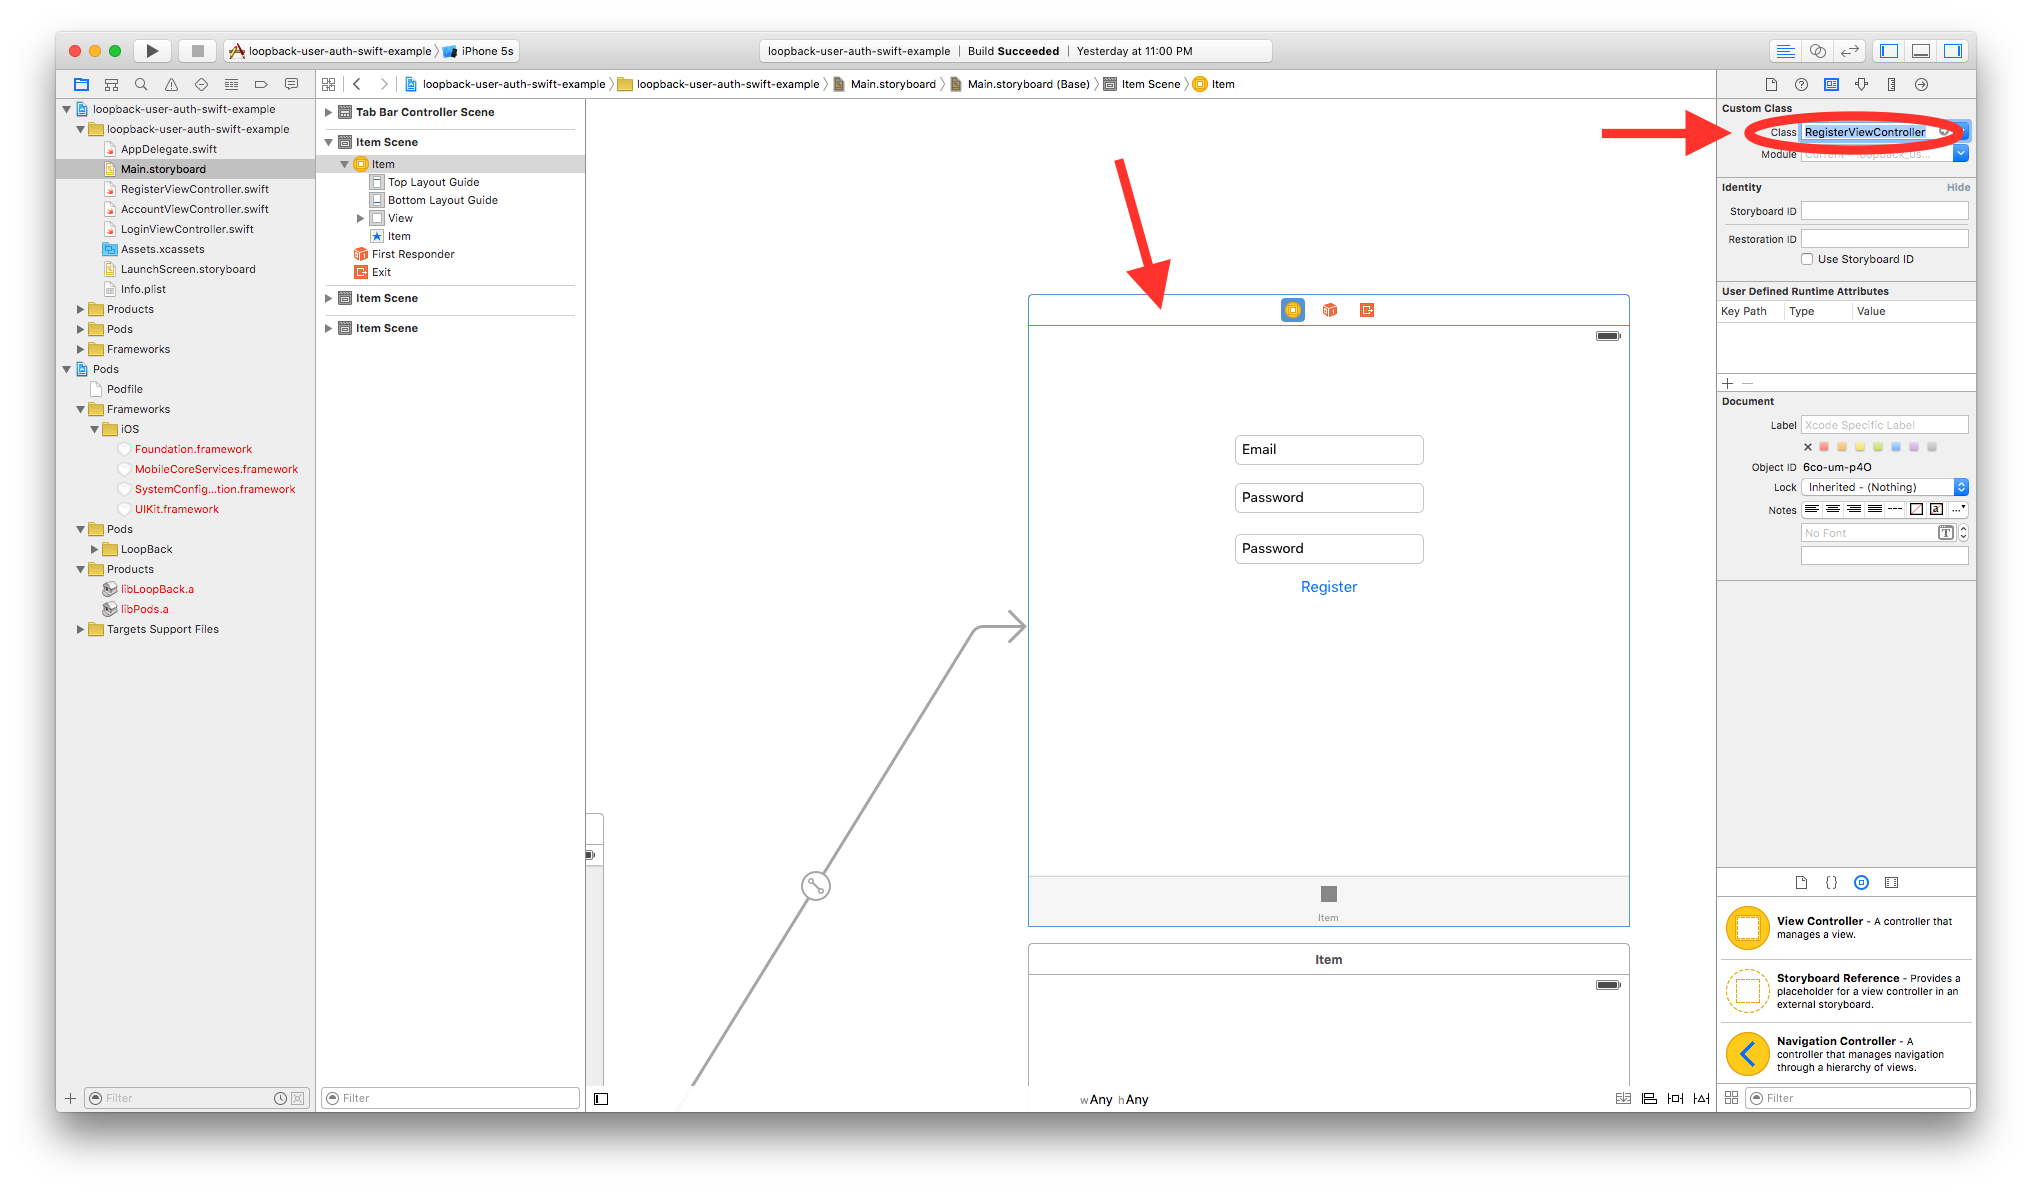
Connect each View Controller in the Storyboard with our ViewController classes that we just created. In the Identity Inspector under “Custom Class” tell XCode to use the custom classes. Do this for each of the 3 View Controllers: RegisterViewController, LoginViewController and AccountViewController.
IBOutlets and IBActions
In order to control the Labels and Buttons we need IBOutlets and IBActions in the appropriate View Controllers.
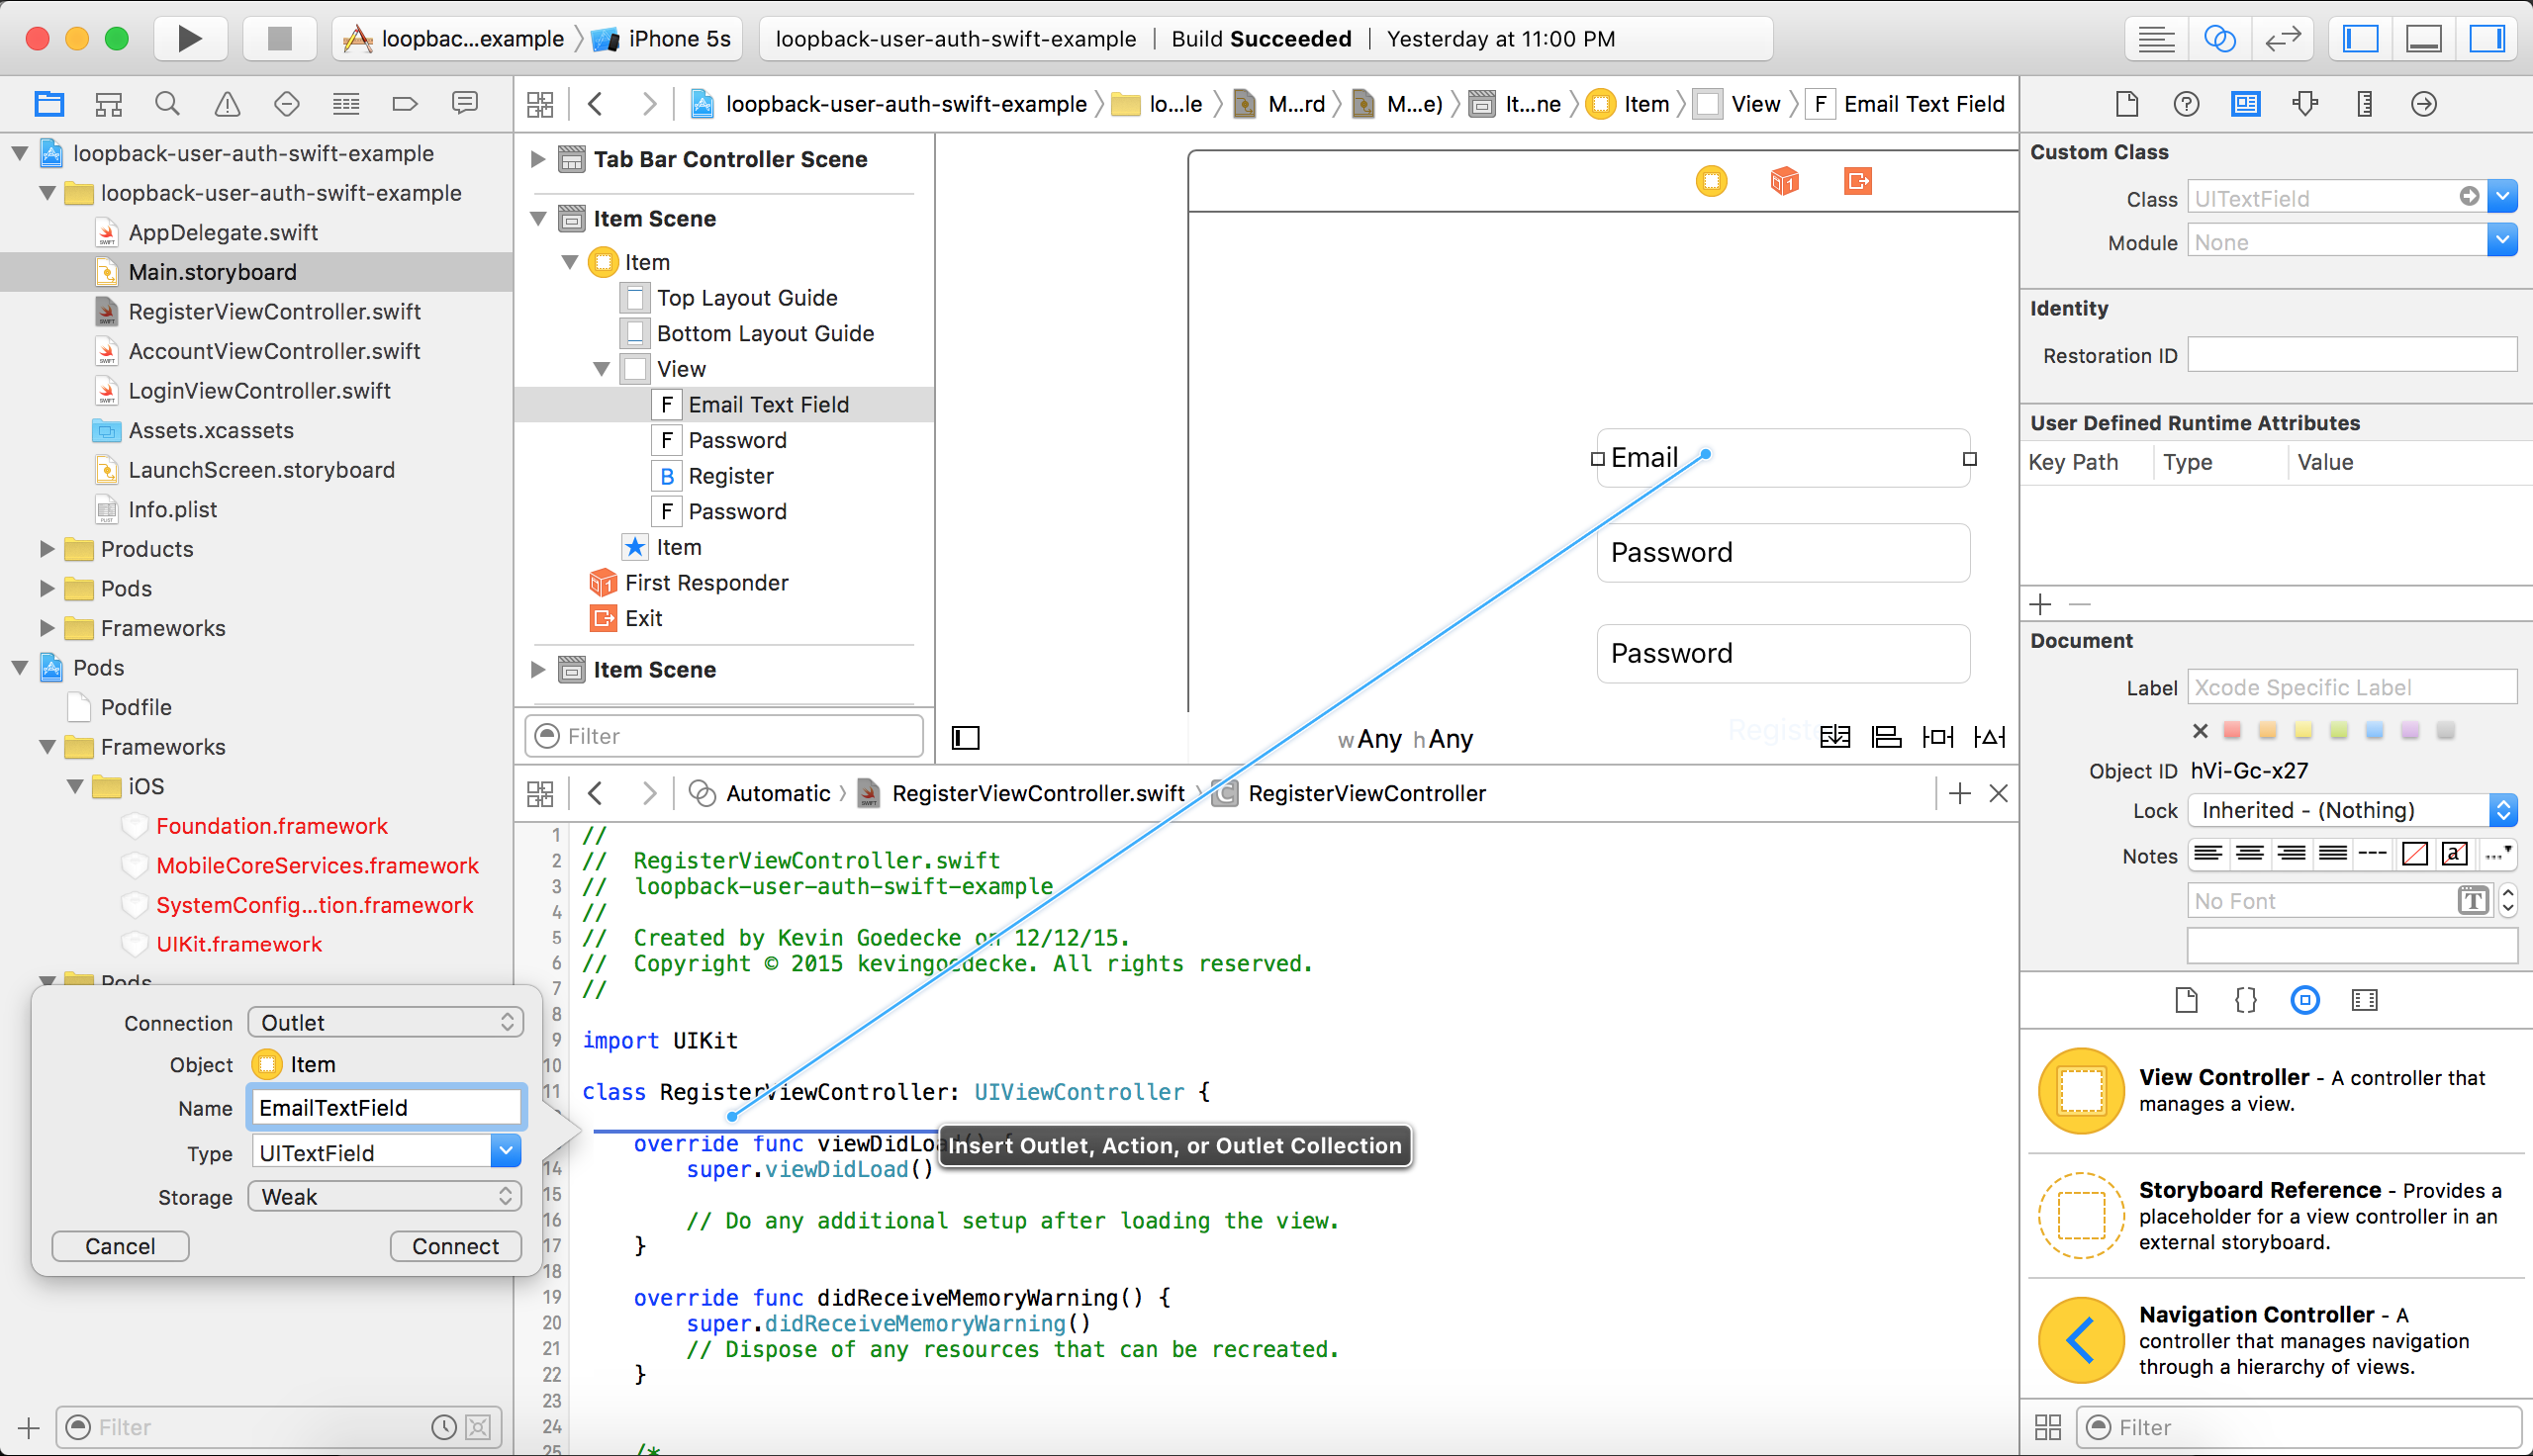
Open the RegisterViewController.swift and use the Assistant Editor to display both the Storyboard and the code of the View Controller.
Select the Email Field and hold CTRL and drag the Email Field onto the Storyboard at the first line of the RegisterViewController class. A window will pop up and let you create an Outlet for the TextField.
Repeat those steps for the 2 password fields and name the Outlets “PasswordTextField” and “RepeatPasswordTextField”.
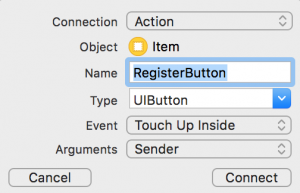
Afterwards select the Register Button from the Storyboard and CTRL + Drag it to the RegisterViewController as well. This time select Action as the Connection type so XCode will create an IBAction instead of an IBOutlet.
Afterwards your RegisterViewController.swift should have the following Outlets and Actions:
@IBAction func RegisterButton(sender: UIButton) {
}
@IBOutlet weak var RepeatPasswordTextField: UITextField!
@IBOutlet weak var PasswordTextField: UITextField!
@IBOutlet weak var EmailTextField: UITextField!
Now go ahead and create the appropriate IBOutlets and IBActions in the LoginViewController.swift :
@IBAction func LoginButton(sender: UIButton) {
}
@IBOutlet weak var PasswordTextField: UITextField!
@IBOutlet weak var EmailTextField: UITextField!
For the AccountViewController you only need to create Outlets for the Labels that will actually change its value and of course IBActions for the two buttons on the bottom.
Afterwards you should have the following IBOutlets and IBActions in your AccountViewController:
@IBAction func LogoutButton(sender: UIButton) {
}
@IBAction func ChangeEmailButton(sender: UIButton) {
}
@IBOutlet weak var EmailLabel: UILabel!
@IBOutlet weak var UserIDLabel: UILabel!
@IBOutlet weak var AccessTokenLabel: UILabel!
LoopBack API Connection
Now that we have our UI Elements in plaace, let’s look into how to connect the app to our LoopBack Backend using the SDK.
Open your AppDelegate.swift and add the following line as a local Variable in the AppDelegate, for example right after the declaration of var window: UIWindow?:
var adapter:LBRESTAdapter = LBRESTAdapter(URL: NSURL(string: "http://api.backend.com:3000/api/"))
The LBRESTAdapter gives you access to your LoopBack REST API and now that it’s in the AppDelegate you can access it pretty much from everywhere in your code.
Before we can access our custom LoopBack “Client” model, we need to let Swift know that there actually is such a model and that it derives from the LBUserModel.
For this we are going to create a new new Class named ClientRepository.
Select “File” -> “New” -> “File…” and select Swift File and name it ClientRepository.swift.
Add the following code:
class ClientRepository: LBUserRepository {
    override init!(className name: String!) {
        super.init(className: "Clients")
    }
    override init() {
        super.init(className: "Clients")
    }
}

class Client: LBUser {

}
Next we will create a new Class called BackendUtilities.swift, that will provide access to our Client model which is a subclass of the LoopBack User model.
Select “File” -> “New” -> “File…” -> “Swift File” and name it BackendUtilities.swift.
Insert the following code:
class BackendUtilities  {
    let appDelegate = (UIApplication.sharedApplication().delegate as! AppDelegate!)
    let DEFAULTS_CURRENT_USER_ID_KEY: String = "LBUserRepositoryCurrentUserId"
    var adapter: LBRESTAdapter
    var clientRepo: ClientRepository

    static let sharedInstance = BackendUtilities()

    init() {
        adapter = appDelegate.adapter as LBRESTAdapter!
        clientRepo = adapter.repositoryWithClass(ClientRepository) as! ClientRepository
    }
}
The code follows the singleton pattern to enable you to make static calls and always access the same LBRESTAdapter as well as the same ClientRepository. Later you’ll be able to simply call BackendUtilities.sharedInstance.clientRepo to access your ClientRepository and perform actions.
The DEFAULT_CURRENT_USER_ID_KEY constant holds the key that the LoopBack SDK internally uses to store the User ID in the NSUserDefaults.
RegisterViewController
Now that we have everything in place, let’s can put the pieces together.
Let’s start with the RegisterViewController.
Open the RegisterViewController and add the following code into the RegisterButton IBAction:
if (PasswordTextField.text != RepeatPasswordTextField.text) {
    let alertController = UIAlertController(title: "Password", message:
        "The passwords don't match", preferredStyle: UIAlertControllerStyle.Alert)
    alertController.addAction(UIAlertAction(title: "Dismiss", style: UIAlertActionStyle.Default,handler: nil))
    self.presentViewController(alertController, animated: true, completion: nil)
}
else    {
    let user:Client = BackendUtilities.sharedInstance.clientRepo.createUserWithEmail(EmailTextField.text!, password: PasswordTextField.text!) as! Client

    user.saveWithSuccess({ () -> Void in
        NSLog("Successfully registered new user.")

        // Display registration confirmation
        let alertController = UIAlertController(title: "Registration", message:
            "New user successfully registered", preferredStyle: UIAlertControllerStyle.Alert)
        alertController.addAction(UIAlertAction(title: "Dismiss", style: UIAlertActionStyle.Default,handler: nil))
        self.presentViewController(alertController, animated: true, completion: nil)
    }) { (error: NSError!) -> Void in
        NSLog("Error")

        // Display error alert for registration
        let alertController = UIAlertController(title: "Registration", message:
            "Error creating new user", preferredStyle: UIAlertControllerStyle.Alert)

        alertController.addAction(UIAlertAction(title: "Dismiss", style: UIAlertActionStyle.Default,handler: nil))
        self.presentViewController(alertController, animated: true, completion: nil)
    }
}
Line 1-6: Simply checks if the passwords in the input fields match and in case they don’t, fires an UIAlertController.
Line 8: Get’s the ClientRepository from the BackendUtilities that we created earlier and calls the createUserWithEmail method of it.
Line 10-18: Calls saveWithSuccess and handles what happens in case of the successful creation of the user. We simply going to display a UIAlertController here to inform the user that everything worked and he’s all set.
Line 19-27: Handles the behavior in case an error occurred and displays and error message in an UIAlertController accordingly.
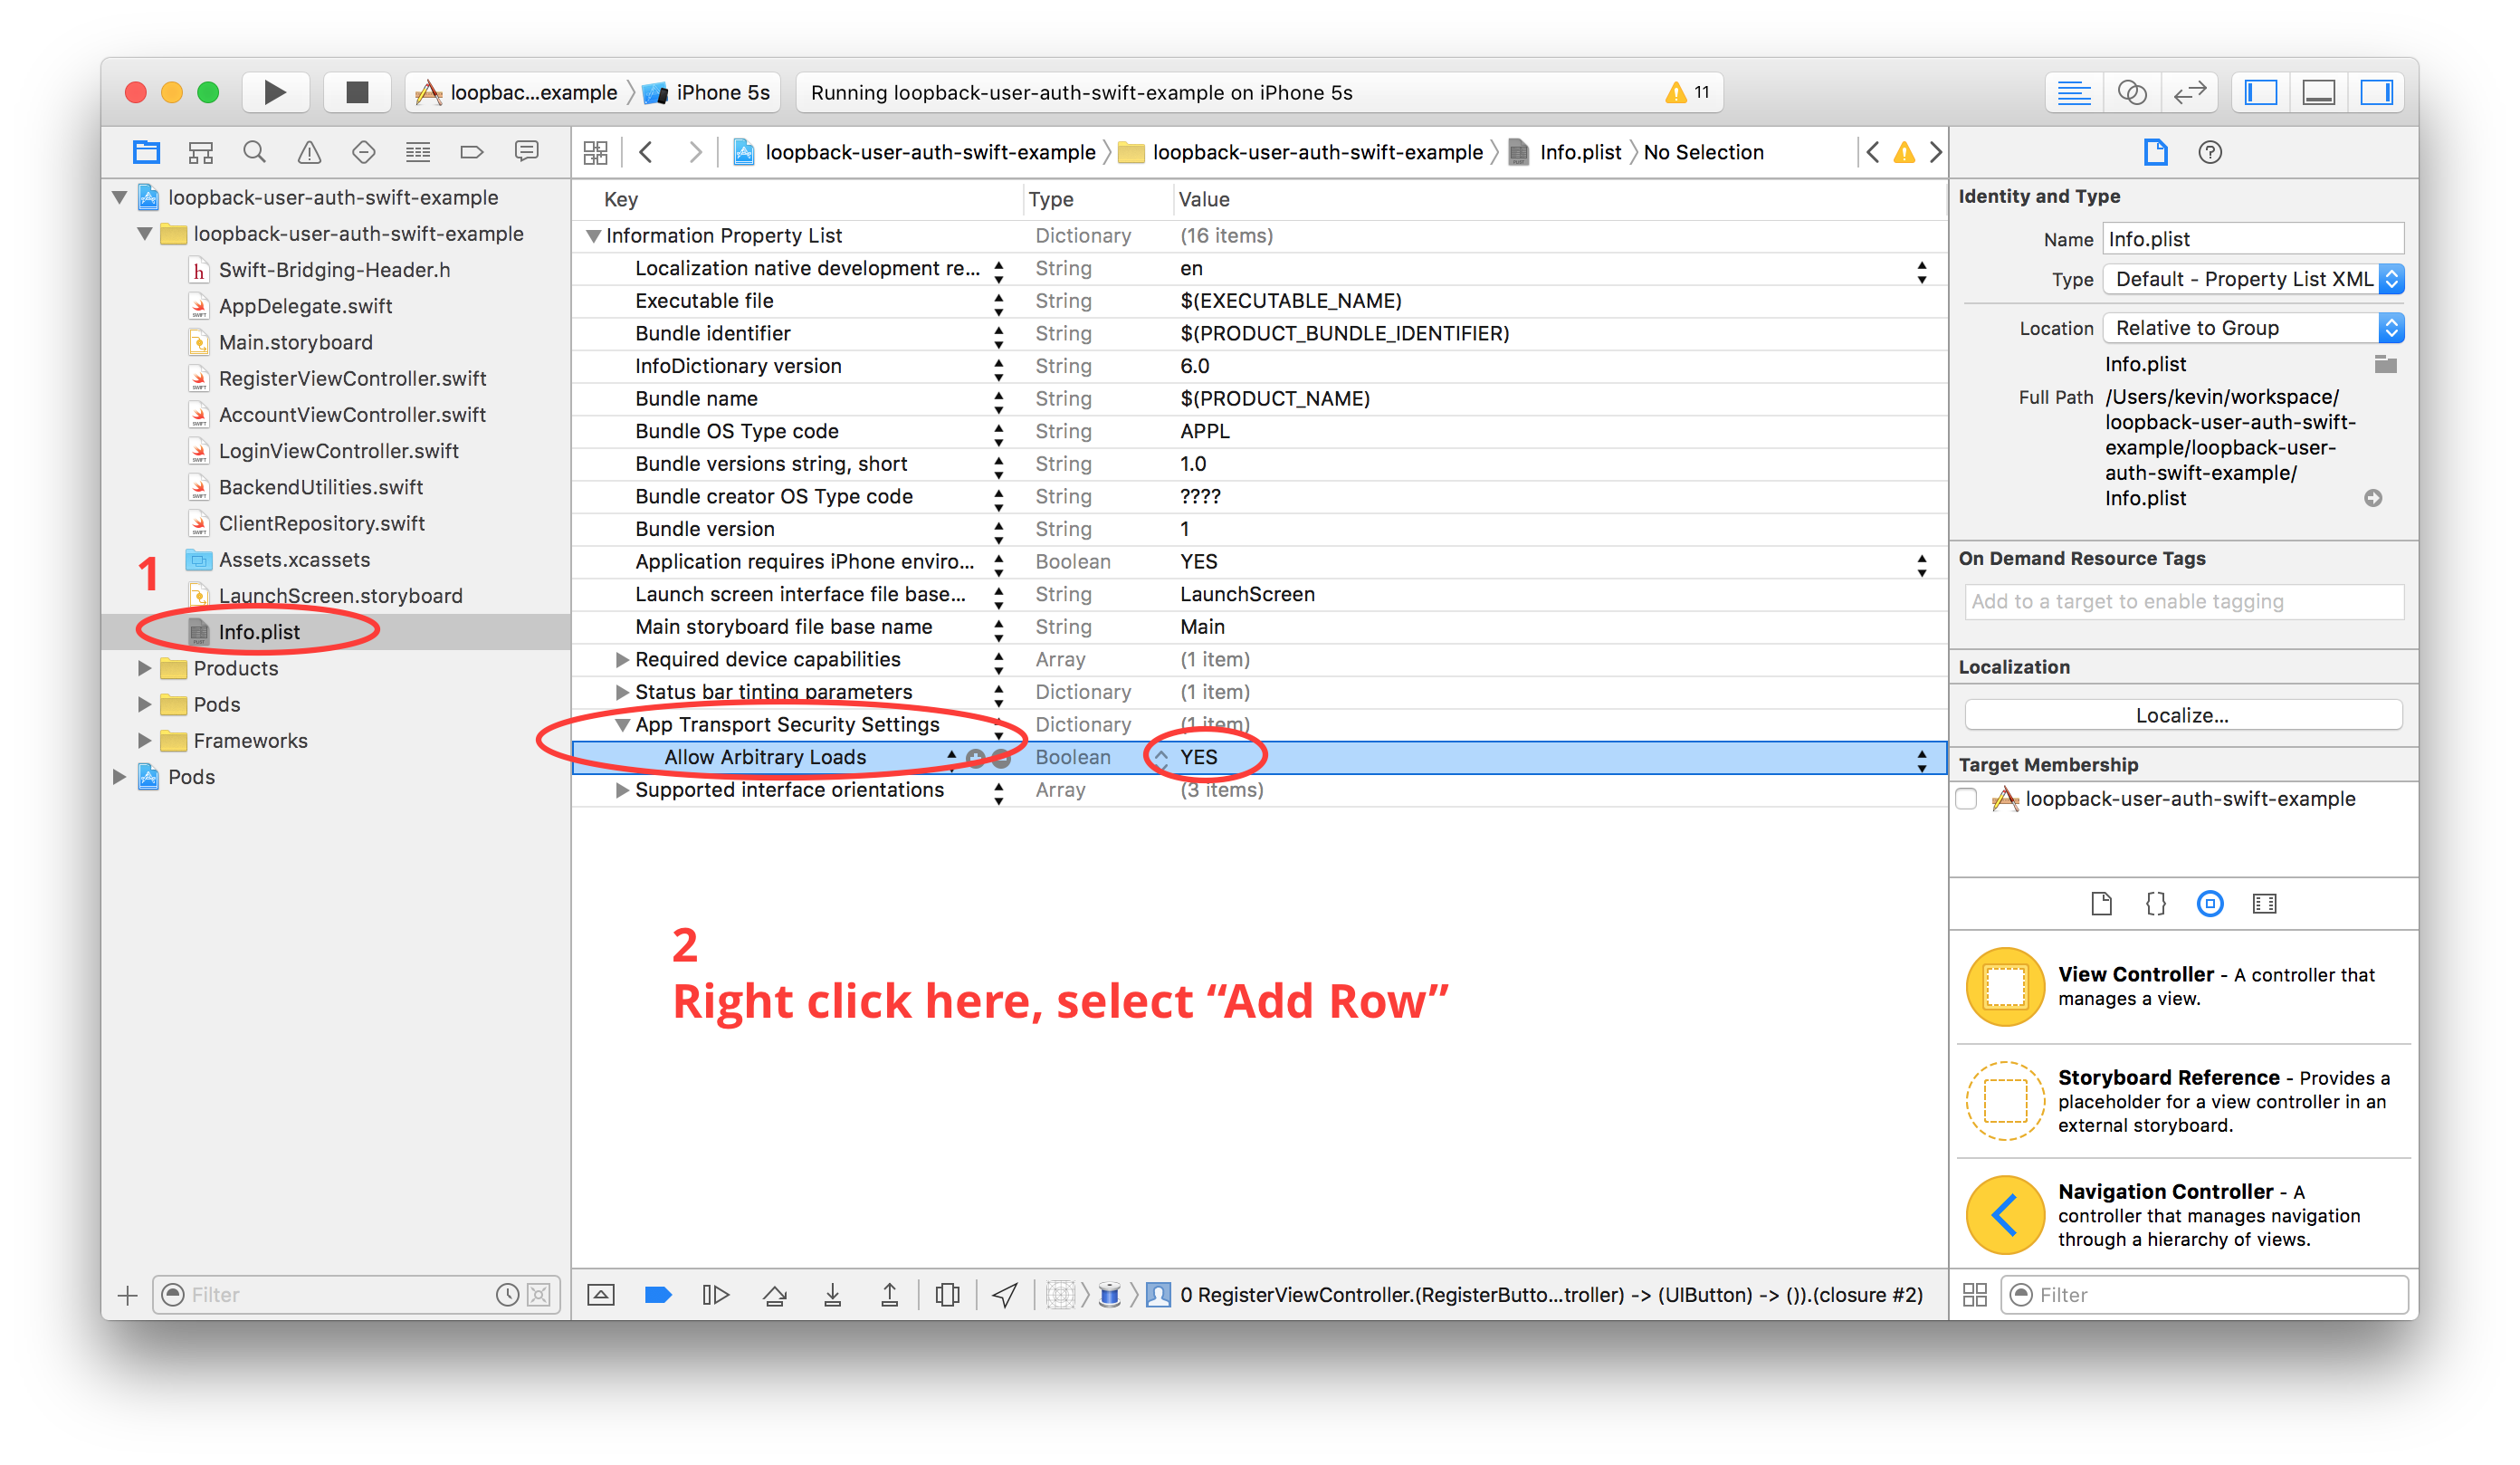
Allowing HTTP Connections
The only thing missing for our app to have it’s first feature ready is that by default XCode doesn’t allow insecure HTTP connections.
Open your Info.plist file, right click and select “Add Row”. Type in “App Transport Security Settings” as key and afterwards create a sub-entry with the key “Allow Arbitrary Loads” that has the value “YES”.
Your plist file should look like this:
 Congratulations: If you run your app now, you should be able to register a new user with your existing LoopBack API.
LoginViewController
Open your LoginViewController and add the following code to your LoginButton IBAction:
@IBAction func LoginButton(sender: UIButton) {
    BackendUtilities.sharedInstance.clientRepo.userByLoginWithEmail(EmailTextField.text, password: PasswordTextField.text, success: { (LBUser client) -> Void in
            NSLog("Successfully logged in.");

            // Display login confirmation
            let alertController = UIAlertController(title: "Login", message:
                "Successfully logged in", preferredStyle: UIAlertControllerStyle.Alert)
            alertController.addAction(UIAlertAction(title: "Dismiss", style: UIAlertActionStyle.Default,handler: nil))
            self.presentViewController(alertController, animated: true, completion: nil)
        }) { (error: NSError!) -> Void in
            NSLog("Error logging in.")

            // Display error alert
            let alertController = UIAlertController(title: "Login", message:
                "Login failed", preferredStyle: UIAlertControllerStyle.Alert)
            alertController.addAction(UIAlertAction(title: "Dismiss", style: UIAlertActionStyle.Default,handler: nil))
            self.presentViewController(alertController, animated: true, completion: nil)
    }
}
Line 2: Simply calls userByLoginWithEmail on our clientRepo to login the user by the email and password provided.
Line 5-9: Displays the login confirmation in the case the login succeeds.
Line 13-17: Displays an UIAlertController error message in the case the login fails.
AccountViewController
First we are going to fill the labels in the AccountViewController with data.
Add the following code to your AccountViewController.swift:
var currentUser: Client

required init(coder aDecoder: NSCoder) {
    currentUser = Client()
    super.init(coder: aDecoder)!
}
Line 1: Creates a local variable named currentUser that holds the currently logged in User.
Line 3-6: Adds a designated initializer and actually initializes the currentUser object.
Next add a function that assigns the currentUsers details to the IBOutlets we created earlier. We will call this function later when changes are being made.
func loadUserInformation()  {
    AccessTokenLabel.text = BackendUtilities.sharedInstance.adapter.accessToken
    UserIDLabel.text = currentUser._id as? String
    EmailLabel.text = currentUser.email
}
Now override the viewDidAppear function so when the view appears we can load the users details from the SDK into the currentUser object.
override func viewDidAppear(animated: Bool) {
    BackendUtilities.sharedInstance.clientRepo.findCurrentUserWithSuccess({ (client) -> Void in
        NSLog("Found user")
        if let _ = client    {
            self.currentUser = client as! Client
            self.loadUserInformation()
        }
    }) { (error: NSError!) -> Void in
        NSLog("Error fetching current user")
    }
}
findCurrentUserWithSuccess internally looks up if the User ID is set in the NSUserDefaults (key: LBUserRepositoryCurrentUserId) and if it’s set returns success. In this case we are going to set the currentUser to the the returned client and also call loadUserInformation to load the data into the UI Labels.
All that’s left is adding functionality to the Logout button and to the Change Email button.
@IBAction func LogoutButton(sender: UIButton) {
    BackendUtilities.sharedInstance.clientRepo.logoutWithSuccess({ () -> Void in
        // Reset local Client class object
        NSLog("Successfully logged out")

        // Display logout confirmation
        let alertController = UIAlertController(title: "Logout", message:
            "Successfully logged out", preferredStyle: UIAlertControllerStyle.Alert)
        alertController.addAction(UIAlertAction(title: "Dismiss", style: UIAlertActionStyle.Default,handler: nil))

        self.presentViewController(alertController, animated: true, completion: nil)

        self.currentUser = Client()
        self.loadUserInformation()
    }) { (error: NSError!) -> Void in
        NSLog("Error logging out")
    }
}
Line 2: Calls the logoutWithSuccess function on the ClientRepository
Line 13: Sets the currentUser object to a new empty Client object
Line 14: Calls loadUserInformation to update the Labels through its IBOutlets
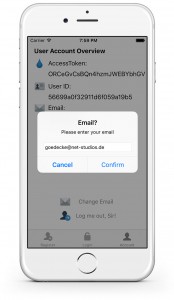
@IBAction func ChangeEmailButton(sender: UIButton) {
    let alertController = UIAlertController(title: "Email?", message: "Please enter your email", preferredStyle: .Alert)
    let cancelAction = UIAlertAction(title: "Cancel", style: .Cancel) { (_) in }
        alertController.addTextFieldWithConfigurationHandler { (textField) in
            textField.placeholder = title
        }
    let saveAction = UIAlertAction(title: "Confirm", style: .Default) { (_) in
        if let field = alertController.textFields![0] as? UITextField {
            // store your data
            self.currentUser.email = field.text
            self.currentUser.saveWithSuccess({ () -> Void in
                NSLog("sucessfully saved")
                }, failure: { (error: NSError!) -> Void in
                    NSLog("error saving")
                })
            self.loadUserInformation()
        }
    }
    alertController.addAction(cancelAction)
    alertController.addAction(saveAction)
    self.presentViewController(alertController, animated: true, completion: nil)
}
Line 10: Set the email of the currentUser object to the one that was entered in the UIAlertController
Line 11: Call saveWithSuccess on the currentUser object to execute the saving of the email address
After adding those two Actions you should be able to logout as well as change the email address of the currently logged in user.
Conclusion
That’s it! 😉 You now have an app that provides basic user management features.
This tutorial should give you a good starting point to develop your own app based on a LoopBack Backend. You should be able to easily extend it and take it further from here.
You can find the complete source code of this tutorial on GitHub.
Great tutorial! Can you provide some code to be able to use remote methods and query relations?
Thanks
@Logiq: Thanks 😉 I’m currently working on a simple CRUD tutorial in Swift that I’ll release next week. I might do something with relations afterwards, stay tuned! Just follow me on twitter @kgoedecke
that he had promised Jane and the girls that they wouldn’t have to face that while they were still alive (and I think El1reoaRn7;s still in her twenties).
This is a great tutorial, thank you very much for sharing your knowledge – exactly what I was looking for. I had one question regarding the userByLoginWithEmail – I am using the “realm” in addition to the username and password fields for logging in. It works with the angular app and for my REST/Alamofire authentication, but was wondering how to use it with the SDK. Thank you!
Solved it – thought I would share. You can pass the realm with the username/email field as long as you specify the realmDelimiter in the LoopBack model config – example “:”
Thanks again for the tutorial!
Steve, thanks for your feedback. I’m also currently working with the LoopBack SDK and Realm, how is your experience so far? I’m thinking about publishing an other tutorial, but I’m still facing a lot of problems.
Hey Kevin,
Sorry for the delayed reply. Glad to hear you are thinking about another tutorial – I have enjoyed the two already published. I too was facing some problems – and the security around the models was an issue regarding roles. On the server side we have opted to create remote operation hooks in order to better control access. I am now shifting efforts toward Alamofire and PromiseKit to write and APIController and get the data that way (but still using Loopback SDK for authentication to return the token ).
Yeah I also looked in to Alamofire a few weeks ago. Stay tuned for more stuff 😉 So far I haven’t found something that can’t be done with the SDK though I’m sure I’ll run into problem when creating the relations tutorial!
Hi Kevin,
Thanks for the great tutorials! They have helped me greatly in getting our project up and running. Today I discovered that LoopBack iOS SDK stores the user’s access token in NSUserDefaults as well. This is a showstopper for us since it renders our LoopBack web service insecure. I guess I will be rewriting the LBRestAdapter. 🙁
Why do you consider that insecure, its how most apps handle user authentication?
Hey Kevin, Parse uses keychain, FaceBook uses NSUserDefaults. The app I’m working on needs a higher level of security as in banking or healthcare apps. I agree that for some apps storing passwords or session tokens in a plist *may* be ok, but I think it’s generally a bad idea.
I wonder why, because only the app that set the NSUserDefaults can access it, its not that every app can access every NSUserDefault set by what ever app. The password is never stored in the NSUserDefaults its simply the accessToken.
I found this quite interesting: http://stackoverflow.com/questions/13920863/best-practice-of-saving-an-access-token-in-ios
It also states that you could also easily dump the KeyChain.
Tools like iExplorer can browse the iPhone file system and look at the program’s documents directory, etc.. Anything in plain text can be viewed. Keychain is relatively secure, except on phones that have been jailbroken.
Hey Kevin,
I have the pod and the framework installed but I can’t see to import “LoopBack”.
In AppDelegate, LBRESTAdapter is unidentified.
Any thoughts?
Thanks for the great looking tutorial!
My LoopBack folder is there with all the files but is located at /Users/Sean/Documents/xcodeApps/loginstrongloopDemo/Pods/LoopBack/LoopBack
Any idea why Swift cant read it ?
Hi Kevin
i am sorry for German Team in EU , but you still have a great team.
i need your help in my first App, i need the perfect code for sign up-sign in-login&logout
Forget Password , and which server do you recommend retrieve user info.
Regards
AA
You can use the code from the github repo as a starting point: https://github.com/kgoedecke/loopback-swift-user-example other functionality like forgot password and registration emails are part of the LoopBack backend, not the client side. There are already numerous examples online, just hit up Google.
Thanks for great tutorial. It helps me a lot.
Just one question, how to I put a custom header field into requests rather than just accessToken?
Thanks.
What exactly are you trying to achieve? I don’t think its intended nor possible by the LoopBack SDK to add custom header fields to the request.
Cheers
Kevin
My loopback api app requires to put another token (3rd party) into the header and have a middle-ware to process it.
So I want to put a new field into the header rather than access_token. Seems they don’t provide a way to do it.
Thanks.
How can i login with username/password instead of email/password??
I see you don’t monetize kevingoedecke.com, don’t waste your
traffic, you can earn extra bucks every month with new monetization method.
This is the best adsense alternative for any type of website (they approve all sites), for more
details simply search in gooogle: murgrabia’s tools